HTB Sherlock - Ore Writeup
 HTB Sherlock - Ore Writeup
Sherlock Scenario
One of our technical partners are currently managing our AWS infrastructure. We requested the deployment of some technology into the cloud. The solution proposed was an EC2 instance hosting the Grafana application. Not too long after the EC2 was deployed the CPU usage ended up sitting at a continuous 98%+ for a process named “xmrig”. Important Information Our organisation’s office public facing IP is 86.5.206.121, upon the deployment of the application we carried out some basic vulnerability testing and maintenance.
Artefacts
After extracting the downloaded ZIP file, we get another archive file catscale_ip-172-31-13-147-20221124-1501.tar.gz and the usr directory (Fig. 1).
usr directory, there is a subdirectory share, followed by the home directory of the user grafana containing Grafana application files (configuration files, logs, bin directory, and data directory) (Fig. 2).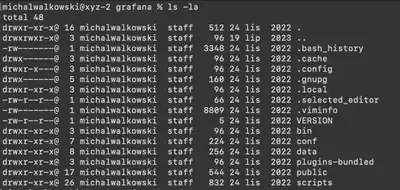
usr directory.
The archive catscale_ip-172-31-13-147-20221124-1501.tar.gz contains additional system logs, home directories of other users, a list of processes, open ports, etc. In total, we received about 5,578 files to solve the task (Fig. 3).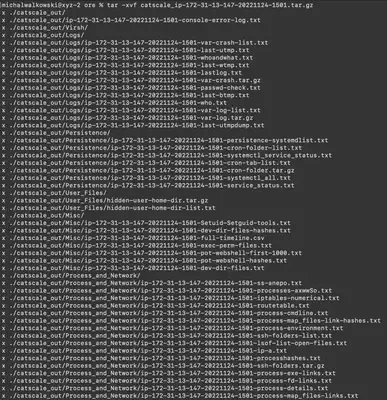
catscale_ip-172-31-13-147-20221124-1501.tar.gz.
Solution
Task 1
Which CVE led to the initial compromise of the EC2?
Initially, I examined the home directory of the Grafana user located in the usr/share/grafana subdirectory. There, I found a file containing information about the Grafana version 8.0.2 (Fig. 4).
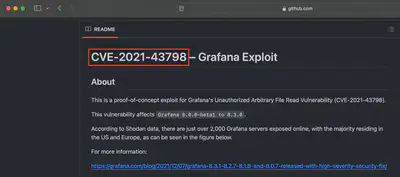
Answer: CVE-2021-43798
Task 2
Please detail all malicious IP addresses used by the threat actor (TA) targeting our organisation.
To find the IP addresses used by the attacker during the initial phase of the attack, I first analyzed what exactly the exploit I found does (Fig. 6). From the exploit’s code, I deduced two values I focused on in the first phase. The first was the User-Agent header, but I did not find any log entries for the specified value (Fig. 7). Next, I decided to search for the first request made by the exploit. The exploit, to check for Grafana’s vulnerability, tries to fetch the /etc/passwd file. I thought it would be a good idea to start by finding all occurrences of passwd in the logs. This time I was successful and got results (Fig. 7).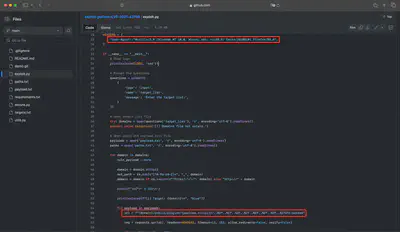
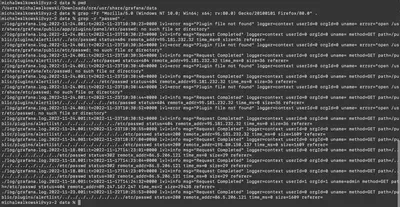
passwd file, excluding the IP address 86.5.206.121 because, as we know from the task description, it belongs to the organization (Fig. 8). Three addresses remained. To determine which of these addresses belonged to the attacker, I had to analyze each case individually.
passwd, but it failed and did not perform any other interesting interactions with the system, so I excluded it (Fig. 9).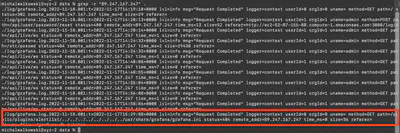
passwd file, sample.ini, and defaults.ini, so this is definitely an attacker’s address (Fig. 10).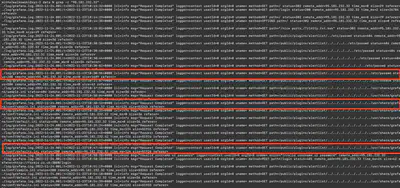
passwd file, so it can be assumed that it also belongs to the attacker.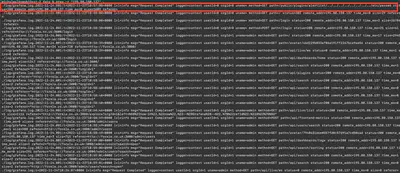

Answer: 44.204.18.94, 95.181.232.32, 195.80.150.137
Task 3
Which account did the TA utilize to authenticate to the host OS?
I found the answer to this question by reviewing the collected logs in the Logs directory and the file ip-172-31-13-147-20221124-1501-lastlog.txt, which contains information about the last user logins. It shows the attacker’s IP address and the username grafana (Fig. 13).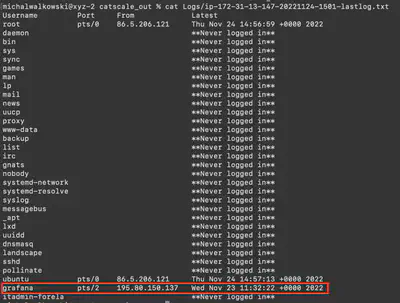
ip-172-31-13-147-20221124-1501-lastlog.txt
Answer: grafana
Task 4
Which file did the TA modify in order to escalate privileges and run the mining service as “root”?
From the previous task, I knew that the attacker logged into the grafana user account. I checked the contents of this user’s home directory and noticed a .bash_history file, which in Linux systems contains the history of commands executed by the user (Fig. 14).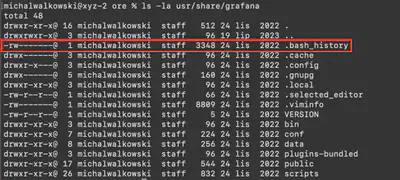
.bash_history file, I found information that the user (attacker) edited the updater.sh file located in the /opt/automation/ directory (Fig. 15).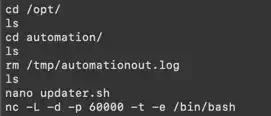
Answer: /opt/automation/updater.sh
Task 5
Which program did the TA utilize to download the injector.sh script?
After extracting all the files located in the catscale_out directory, I used the command grep -r "injector.sh", which allowed me to find the answer almost immediately, in the first result (Fig. 16).
injector.sh script.
Answer: wget
Task 6
Where was the crypto mining binary & config file initially downloaded to?
From the task description, I learned that the attacker downloaded additional software. Therefore, I decided to search for what else was downloaded from IP address 44.204.18.94. I filtered out all results related to the injector.sh script and wget, because as the next task indicates, the attacker used something else to download these two files. In the next step, many entries related to the use of nc appeared, but they also did not contribute to the search, so I filtered them out as well. Ultimately, I obtained six entries, with the first one containing the answer to the question (Fig. 17).
Answer: /opt/automation/
Task 7
Which program did the TA utilize to download both the crypto mining binary & configuration file?
From the information obtained while solving the previous task, in the same log, besides information about the directory, there is also information about the executed
command (Fig. 18).
Answer: curl
Task 8
We need to confirm the exact time the SOC team began artefact collection as this was not included in the report. They utilize the same public-facing IP address as our system administrators in Lincoln.
I must admit, I puzzled over this task for a while. It turned out that the hint about what to look for is in the name of the archive we receive at the beginning of the task (catscale_ip-172-31-13-147-20221124-1501.tar.gz). Catscale, specifically Cat-Scale.sh, is a bash script from WithSecure used to collect artifacts for later analysis. I must admit I was not aware of this. However, once I knew what I was looking for, finding it was very simple. Using the command grep -r "Cat-Scale.sh" . executed in the main directory, I obtained information from the syslog, which contained the date of the script’s first run (Fig. 19).
Answer: 2022-11-24 15:01:00
Task 9
Please confirm the password left by the system administrator in some Grafana configuration files.
The hint to solve this task was already in the text. Since the administrator left a password in the configuration files, it is highly probable that in the configuration file, it would look like this: password=<some password>. Using the command grep -r password, I quickly located the password left by the administrator (Fig. 20).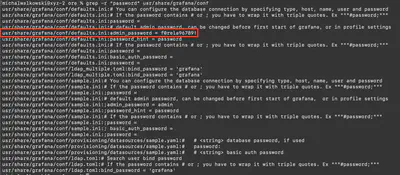
Answer: f0rela96789!
Task 10
What was the mining threads value set to when xmrig was initiated?
Using the command grep -r "xmrig", I searched for everything that might be related to the execution of xmrig. Reviewing the obtained results, I found the answer to the question (Fig. 21).
Answer: 0
Task 11
Our CISO is requesting additional details surrounding which mining pool this may have been utilizing. Please confirm which (if any) mining pool this the TA utilized.
From the results obtained in the previous task, I also found the DNS address to which the mentioned software connected (Fig. 22).
Answer: monero.herominers.com
Task 12
We couldn’t locate the crypto mining binary and configuration file in the original download location. Where did the TA move them to on the file system?
From the results obtained in the previous task (Fig. 23).
Answer: /usr/share/.logstxt/
Task 13
We have been unable to forensically recover the “injector.sh” script for analysis. We believe the TA may have run a command to prevent us from recovering the file. What command did the TA run?
I executed the command grep -r "./injector.sh" again. At the very end of the six results obtained, there was the answer to the question (Fig. 24).
injector.sh file.
Answer: shred -u ./injector.sh
Task 14
How often does the cronjob created by our IT admins run for the script modified by the TA?
The answer to this question is located in the Persistence/var/spool/cron/crontabs/ directory, in the root file. The script is executed daily at 8:30 AM (Fig. 25).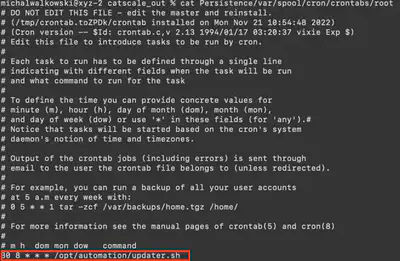
Answer: daily - 08:30