HTB Sherlock - Lockpick4.0 Writeup
 HTB Sherlock - Lockpick4.0 Writeup
Sherlock Scenario
Forela.org’s IT Helpdesk has been receiving reports from employees experiencing unusual behavior on their Windows systems. Within 30 minutes, the number of affected systems increased drastically, with employees unable to access their files or run essential business applications. An ominous ransom note appeared on many screens, asking the users to communicate with the ransomware group’s customer service department. It became apparent that Forela.org was under a significant ransomware attack. As a member of Forela.org’s Incident Response (IR) team, you have been assigned a critical task. A ticket has been created for you to reverse engineer the ransomware that has compromised Forela.org’s Windows systems. Your objective is to fully understand the ransomware’s capabilities and extract any Indicators of Compromise (IOCs) to feed into the organization’s detection tools, preventing further infection.
Artefacts
To solve the task, we receive the following files (Fig. 1):
DANGER.txt– contains a warning and the password to unzip themalware.ziparchive,malware.zip– the archive containing malware, which we need to analyze to solve the task.

malware.zip archive, we only get one file, defenderscan.vhdx. Files with the .vhdx extension are virtual hard disk images used by Hyper-V technology (Fig. 2).
malware.zip archive.defenderscan.js (Fig. 3).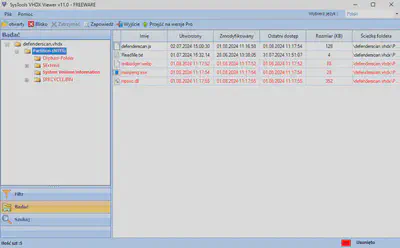
defenderscan.vhdx file.qemu-img convert -f vhdx -O raw defenderscan.vhdx defenderscan.raw, I converted the file and then exported the files using FTK Imager (Figs. 4 and 5).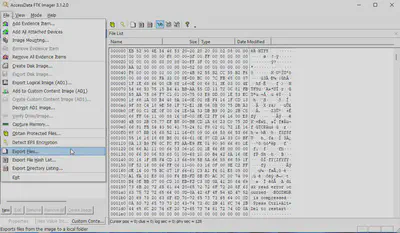
Solution
Task 1
What is the MD5 hash of the first file the ransomware writes to disk?
Thanks to inspecting the contents of the defenderscan.vhdx file with SysTools VHDX Viewer, I obtained information about the creation time of the files in the system. The first file created was defenderscan.js, which after execution, created the file redbadger.webp and then other files (Fig. 6).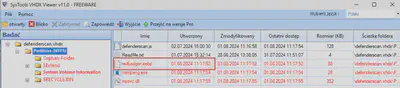
md5sum redbadger.webp, I obtained the MD5 hash (Fig. 7).
Answer: 2c92c3905a8b978787e83632739f7071
Task 2
What is the string that the ransomware uses to check for local administrator privileges?
The file defenderscan.js (Fig. 8) contains JavaScript code that uses ActiveXObject to manipulate files and execute a malicious PowerShell script. The first file created is redbadger.webp, encoded in the variable b64img, which is just an image that I had obtained earlier during the analysis. Much more important is the variable b64s, which contains an encoded PowerShell script. The script decodes this content and then writes it to a temporary file along with information about the current path and filename. The code runs PowerShell with the -ExecutionPolicy Bypass option, allowing the script to bypass system restrictions and execute the malicious code. After completion, the temporary file is deleted.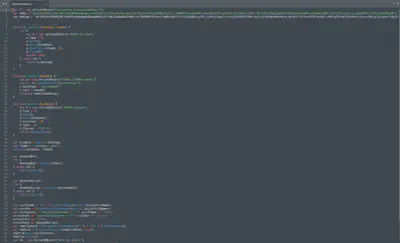
defenderscan.js file.b64s, we get a PowerShell script, which turns out to not be obfuscated. What’s more, it is written with humor - variables and descriptions chosen by the attacker are inspired by Tolkien’s world, and the script even includes comments. Its analysis is not difficult, and after a while, I noticed the comment: “Check if the user is in the local Administrators group by looking for the well-known SID for the Administrators group (S-1-5-32-544)”, clearly showing how the script checks for local administrator privileges (Fig. 9).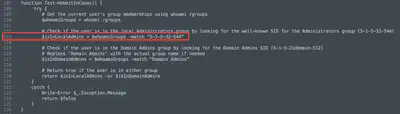
Answer: S-1-5-32-544
Task 3
What is the MITRE ATT&CK ID for the technique used by the threat actor to elevate their privileges?
At the end of the script, there is an interesting part that shows the sequence of calls. First, the condition that calls the Test-HobbitInCouncil function is checked, which verifies if the user has local administrator privileges. If not, the function Bypass-GondorGate is called, responsible for privilege escalation (Fig. 10).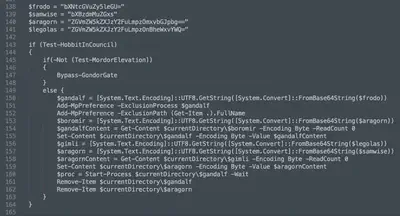
Bypass-GondorGate (Fig. 11) uses the cmstp.exe tool to bypass system protections and execute the malicious process. First, it creates a configuration file named ScrollOfEru.inf in the temporary directory and assigns a location to it. Then, using the System.Diagnostics.ProcessStartInfo object, it configures and launches cmstp.exe with the appropriate arguments that utilize this configuration file. The function waits for the process to finish and sends an ENTER key press via SendKeys to complete the interaction with the called window.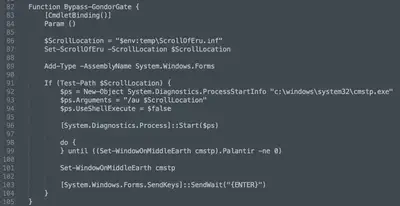
MITRE ATT&CK cmstp.exe immediately provided the answer (Fig. 12).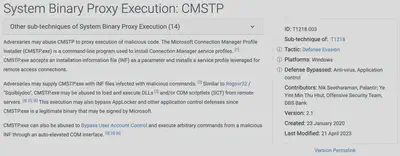
Answer: T1218.003
Task 4
The ransomware starts a process using a signed binary, what is the full name of the signer?
Returning to the main part of the script (Fig. 10), if the user has local administrator privileges, the script attempts to move to the next phase, utilizing processes and files related to system services to conceal its actions. In lines 138-141, there are Base64 encoded file names referring to components associated with antivirus software. Then, the script adds exceptions to the antivirus settings and attempts to run the malware using msmpeng.exe and the mpsvc.dll library (Fig. 13).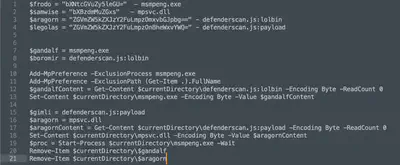
msmpeng.exe file to identify the name of the entity that signed the file (Fig. 14).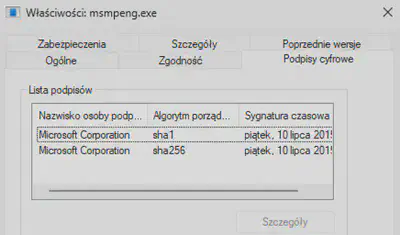
msmpeng.exe file.
Answer: Microsoft Corporation
Task 5
What is the final payloads’ entry point function?
To investigate the further stages of the malware’s execution, I used Ghidra. From the previous task, I knew that the library is executed through the msmpeng.exe file. Therefore, I first examined its contents. The executable file only calls one function, ServiceCrtMain, which is imported from the mpsvc.dll library (Fig. 15).
ServiceCrtMain function from the mpsvc.dll library via msmpeng.exe.
Answer: ServiceCrtMain
Task 6
How many Anti-Debugging techniques does the ransomware implement and what is the Windows API function that the final technique leverages?
It was time for a static analysis of the mpsvc.dll file. I loaded the file into Ghidra and located the ServiceCrtMain function. At the beginning of this function, many variables are initialized. The first method used by the malware is IsDebuggerPresent (Fig. 16), which checks if the program is running under a debugger. If a debugger is detected, the program terminates. Then, using the CreateToolhelp32Snapshot, Process32FirstW, and Process32NextW functions, the malware searches for processes running on the system. The application checks if there is a process with the same name as the current one and if a powershell.exe process is running. If powershell.exe is not found, the program also terminates. The final defense mechanism is found in the call to the FUN_180001ebd0 function.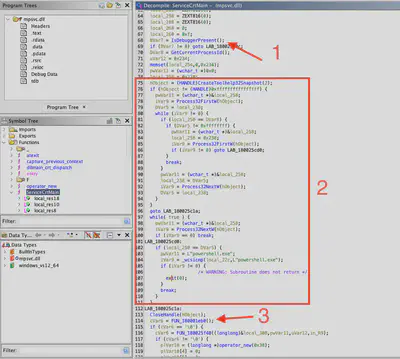
FUN_180001ebd0 function registers a custom exception filter using SetUnhandledExceptionFilter, and then calls the swi(3) instruction, which signals a breakpoint in case of an error (Fig. 17).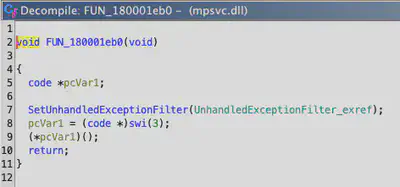
Answer: 3, SetUnhandledExceptionFilter
Task 7
The ransomware targets files with specific extensions, what is the list of extensions targeted in the exact order as the ransomware configuration stores them?
I couldn’t gather more information from static analysis, so in the next step, I decided to perform dynamic analysis. To do this, I set up a VirtualBox machine with Windows 10, configured with FlareVM.
It is important to note that all further steps were performed on an isolated machine where clipboard sharing, file sharing, and other similar functions were disabled. This is critical at this stage because the software being analyzed is real ransomware. By conducting the analysis on a virtual machine and having backups prepared, I avoided accidentally encrypting my disk. Interestingly, it was precisely this accidental encryption that provided the answer to the last questions :)
For further analysis of the malware, I used x64dbg. Based on previous findings from my analysis, I first loaded rundll32.exe, then configured automatic breakpoints so that the debugger would stop when loading the mpsvc.dll file (Fig. 18).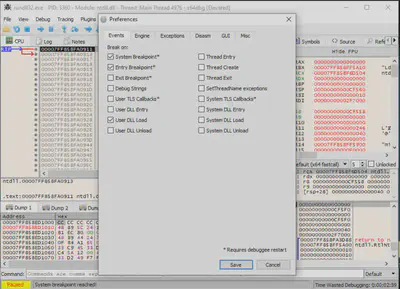
C:\Windows\System32\rundll32.exe C:\Users\michal\Desktop\mpsvc.dll,ServiceCrtMain (Fig. 19).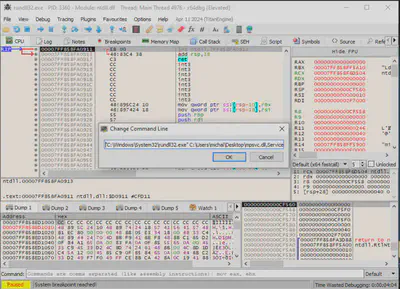
ServiceCrtMain function to set another breakpoint (Fig. 20).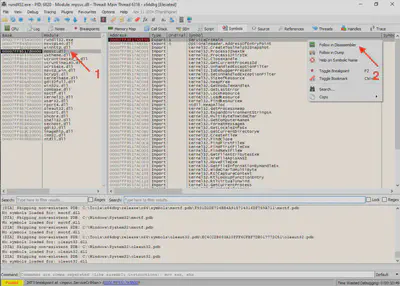
mpsvc.dll.IsDebuggerPresent function call (Fig. 21).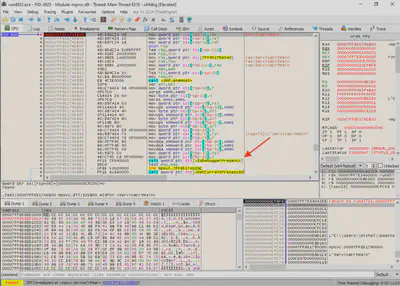
IsDebuggerPresent function call, I selected the “step over” option in the debugger, meaning it executes the instruction without tracing its operation. The next instruction was test eax, eax, which compares the value of the eax register with itself, performing a logical AND operation, and based on the result, it sets the appropriate processor flags. Then the JNE instruction checks the value of the ZF (Zero Flag) and jumps if ZF equals 0. x64dbg offers a useful feature that shows where the jump will go. By changing the ZF value from 0 to 1, I modified the program flow, bypassing the jump instruction, and thus skipping the program’s first protection (Fig. 22).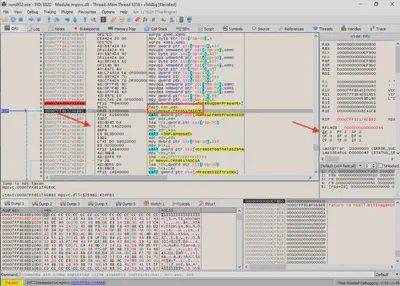
CreateToolhelp32Snapshot function, an assembly CMP instruction compares the value of the rax register with the expected value of -1. Although CreateToolhelp32Snapshot returns a handle to the process list, changing the ZF flag for the JE instruction once again allowed me to modify the program flow and bypass the second protection. The JE instruction jumps if the ZF flag is set to 1. In this case, I changed the ZF value from 0 to 1, which enabled me to bypass the second protection (Fig. 23).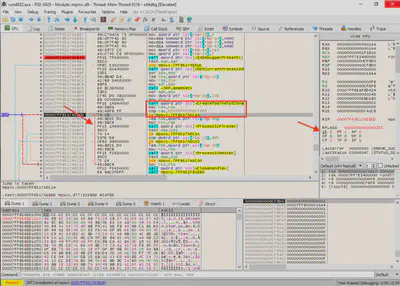
Answer: .doc, .docx, .xls, .xlsx, .ppt, .pptx, .pdf, .txt, .csv, .rtf
Task 8
What is the FQDN of the ransomware server the malware connects to?
To find the FQDN the malware connects to, I first needed to identify where the connection is initiated or configured. Since I had spent considerable time searching for answers during the static analysis, I already had a good understanding of the code. During the static analysis, I noticed the use of the WINHTTP.dll library and functions such as WinHttpConnect (Fig. 25).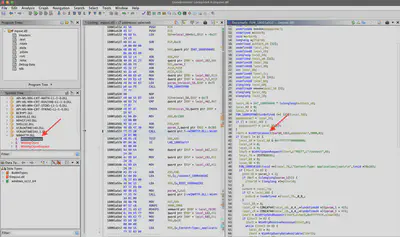
WinHttpConnect function was only called once in the main ServiceCrtMain function (Fig. 26).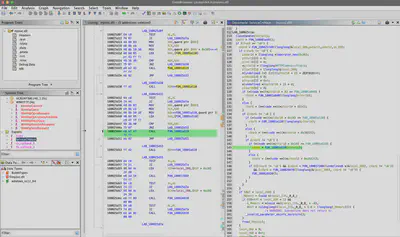
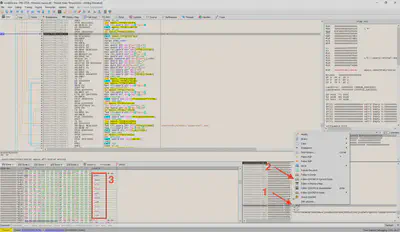
WinHttpConnect function call in the main function.WinHttpConnect function call. Skipping over the fact that I accidentally encrypted the disk a few times, which provided me with answers to the last two questions, I finally managed to reach the appropriate memory location and retrieve the FQDN address the ransomware connects to (Fig. 27).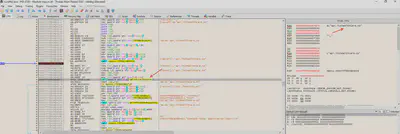
Answer: api.ltchealthcare.co
Task 9
What is the MITRE ATT&CK ID the ransomware uses to run its final payload?
Knowing how the msmpeng.exe file loads the mpsvc.dll library, only one MITRE ATT&CK technique comes to mind (Fig. 28).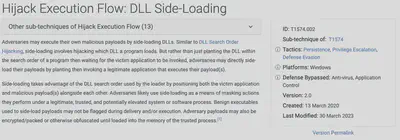
Answer: T1574.002
Task 10
What is the full URL including port number of the ransomware group’s customer service portal?
As I mentioned earlier, since this is actual ransomware, improper handling at some point led to encrypting files on the virtual machine. However, thanks to this accidental incident, I managed to find the answer to the last two questions (Fig. 29).
Answer: yrwm7tdvrtejpx7ogfhax2xuxkqejp2qjb634qwwyoyabkt2eydssrad.onion:9001
Task 11
What is the file extension used to store the newly encrypted files?
From the previous task.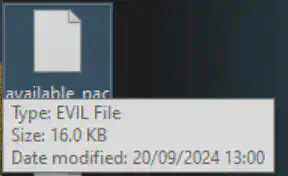
Answer: .evil