Resolving Hostnames in Burp: How to avoid editing the /etc/hosts file
In this article, I will present a method to avoid manual editing of the /etc/hosts file during penetration tests and security audits, utilizing the Burp Suite tool (this option is available in both Enterprise and Community versions). This technique not only enhances the efficiency of tests but also offers greater flexibility, which can be useful for bypassing WAFs such as Cloudflare, for example. The inspiration for this article came from a presentation by @Agarri_FR, which showcases tricks for more effective use of Burp Suite.
 Resolving Hostnames in Burp: How to avoid editing the /etc/hosts file.
In the world of cybersecurity, where we face new challenges every day, it’s not only crucial to have a solid theoretical knowledge but also the ability to quickly adapt to changing conditions. One such challenge is effectively resolving hostnames during penetration tests or security audits, especially when using tools like Burp Suite. Other popular tools such as ZAP and Caido have been omitted because they do not offer this type of functionality. In this article, we will focus on a method that allows avoiding the need to edit the /etc/hosts file on Unix systems, which is usually a standard procedure when working with various domains directed at the tested applications. This method also works on Windows 🙂
The traditional way to solve this problem often involves manually editing the mentioned file. This solution is not only time-consuming but also prone to errors, especially in an environment where rapid adaptation and flexibility are required. Alternatively, I suggest using the functionality of Burp Suite, which allows for internal resolution of hostnames, eliminating the need to modify system files.
Besides the advantages mentioned above, the presented configuration can be invaluable when attempting to bypass Web Application Firewall (WAF) systems, such as Cloudflare, especially when the target server is misconfigured. In such situations, skillful management of hostnames can enable the tester to bypass certain security restrictions and conduct more effective penetration tests.
This method is inspired by a presentation by @Agarri_FR available at: NSEC2023 - Burp Suite Pro tips and tricks, the sequel. By the way, I recommend anyone involved in penetration testing to familiarize themselves with the mentioned tricks.
In this article, I will illustrate the described technique using the configuration of a vulnerable machine available on the HackTheBox portal, which will allow for the practical application of the discussed method. I invite you to read and experiment, hoping that the presented solution will make your tests even more efficient and free from unnecessary manual system configuration.
Below is a step-by-step description. For those who prefer a video, here you can find a clip:
Figure 1 shows the lack of DNS entry configuration. The error Unknown host: hospital.htb indicates that Burp was unable to resolve the requested domain name.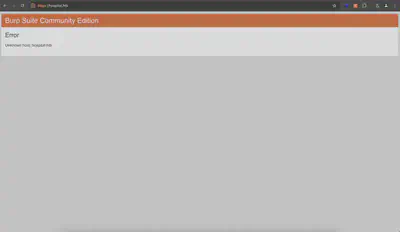
Let’s go back to Burp and select the settings as shown in Figure 2.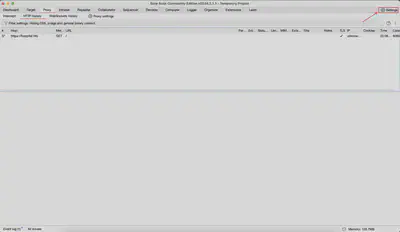
Next, in the settings window, we go to the Network tab (Fig. 3) and the Connections tab (Fig. 4).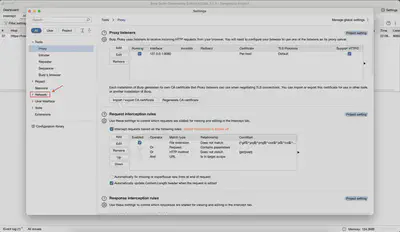
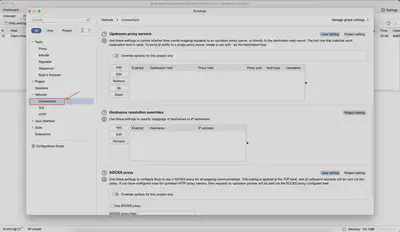
We look for the Hostname resolution overrides option (Fig. 5).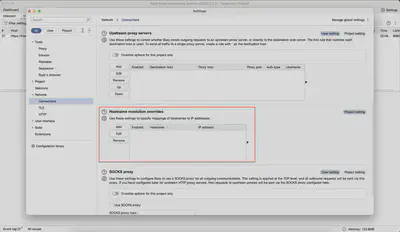
Hostname resolution overrides option.
Click Add and in the IP Address field, we enter the IP address of the server under test. In the Hostname field, we enter the DNS name under which we want the server to be accessible (Fig. 6).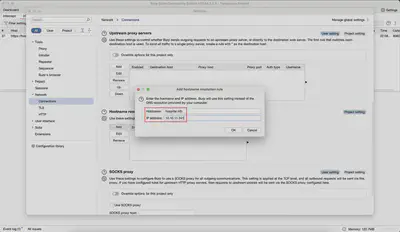
Our added configuration should look similar to the one presented in Figure 7.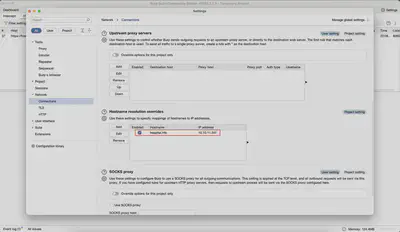
Hostname resolution overrides.
Now we can return to our browser and click Refresh. At this point, a functioning page should be displayed, similar to Figure 8.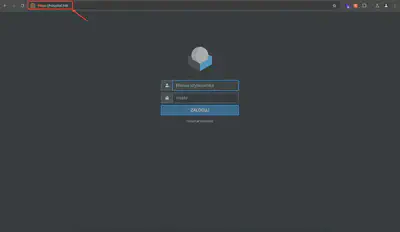
At this point, the reader might wonder about the situation with tools such as sqlmap. The solution is simpler than it might seem. Most tools used during penetration tests allow for proxy configuration. Using an additional proxy, such as Burp, especially with sqlmap, is a very good idea because it allows collecting all requests sent to the server. This means, first, we have collected evidence from the work carried out, and second, in case of any discrepancies, we can always return to the sent requests. Now I will show how to do this.
Figure 9 illustrates an attempt to establish a connection with the server. Since we did not add an entry to the /etc/hosts file, the system was unable to correctly resolve the DNS name, which prevented the connection to the resource we were analyzing.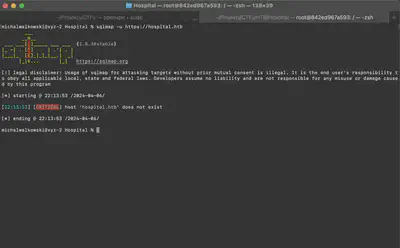
To solve this problem, we add the --proxy flag, directing traffic through Burp. Figure 10 shows that after adding this flag, everything operates correctly.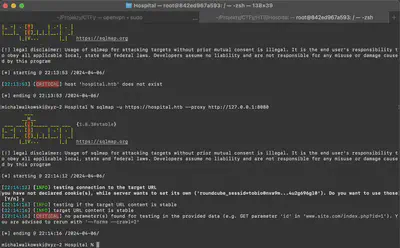
Additionally, in Figure 11, in the history of Burp, we observe the requests that were sent to our server, including those redirected through SQLMap.