Once again, ZAP Scripting, request encryption, and finally, signing.
In this article, I will once again delve into the topic of API testing, which is secured through encryption mechanisms and signing requests using RSA keys. You are already familiar with these mechanisms from my previous posts. However, I have decided to revisit this topic to present solutions tailored to the Zed Attack Proxy (ZAP) software, where the behavior looks significantly different. Furthermore, in this article, I will demonstrate how to utilize two different scripts, executed in the correct order, to modify requests on the fly in a manner expected by the server side. With such a solution, API testing becomes much simpler, as we no longer need to focus on the applied security mechanisms. Additionally, dividing the scripts according to their responsibilities greatly facilitates their usage and allows for their reuse without modification.
 Once again, Zap Scripting, request encryption, and finally, signing.
Problem Description
In previous articles, I explained why I decided to describe the scripts below. I also explained the implementation of the script used for signing requests for the ZAP software. You can also find this script in the community-scripts repository for ZAP software. In this article, I would like to present another script implemented by me, which is used for encrypting requests using RSA keys. When encrypting the request body, the matter becomes somewhat complicated because not only do we want to add something on the fly to the request we are sending, but we also want to replace the body of that request in such a way that it is correctly interpreted by the server. Additionally, we want to have a simple way to identify requests sent to the server, which should not be possible after encryption according to the definition. Why is identifying sent requests crucial for us? Because when we detect a vulnerability, we want to be able to trace the requests sent to the server, which becomes practically impossible when encryption is applied.
As a reminder, the creation of a series of articles on encrypting and signing requests in API is related to a project I had the pleasure of testing. The mechanisms presented here are used in a real API for communication between the backend and a mobile application. In addition to the request signing mechanism (X-Signature header) and protection against replay attacks (X-Nonce-Value and X-Nonce-Created-At headers), which I described in earlier articles, the project author also decided to use encryption of request content using RSA keys. All of these security measures significantly complicate the investigation for attackers, especially in the absence of internal knowledge about the implementation.
In response to those particularly interested in this topic, I have also shared a Flask server PoC on my GitHub account, which allows them to verify the functionality of the scripts presented here.
Another thing I would like to mention is that I have simultaneously released a library for the Flask framework, which allows for easy implementation of request encryption and signing on the server side. You can find the library code at this link, as well as in the Python pypi package manager.
Mechanism Description
In this section, I would like to remind the reader of the differences between the mechanism described in this article and the one described in “Zed Attack Proxy (ZAP) Scripting and Request Signing with RSA Keys.” The current process involves additional steps related to encrypting and decrypting the request content. In the new version, the mechanism looks as follows:
- The application uses the server’s public key to encrypt the request content.
- The application creates a standardized request schema that includes the encrypted message.
- The application adds a unique nonce value to the request, generated using uuid4.
- The application includes the current date in the request.
- The application creates a digital signature of the request using its private key, message content, path, nonce value, and current date.
- The application appends the generated digital signature to the request.
- The API server verifies the correctness of the digital signature using the client’s public key.
- If the digital signature is valid, the API server accepts the request. In case of an invalid signature, the request is rejected.
- The API server decrypts the message using its private key.
Additionally, I would like to remind you that the procedures for exchanging public keys between communication parties have not been detailed in the analyzed mechanism. It is assumed that those implementing this mechanism have already considered all available methods of key exchange. For pentesters, the only task remaining is to confirm this in practice.
In the next part of the article, we will focus on simplifying the entire process by using only one pair of RSA keys.
Implementation
Just like before, to make use of Python capabilities in ZAP, we need to have the Python Scripting extension installed. Similarly to the previous case, I have chosen to select the HTTP Sender script type. I made this decision because I wanted the script to allow me to encrypt messages at any time, whether using Proxy, Attack, or Requester functionalities. You can read more about script types at this link. After creating a new script, we will receive a template that looks like this:
def sendingRequest(msg, initiator, helper):
    # Debugging can be done using print like this
    print('sendingRequest called for url=' +
          msg.getRequestHeader().getURI().toString())


def responseReceived(msg, initiator, helper):
    # Debugging can be done using print like this
    print('responseReceived called for url=' +
          msg.getRequestHeader().getURI().toString())
However, unlike the previous implementation, this time we are interested in modifying both methods. We will use the first method, sendingRequest, to implement our encryption, and the second method, responseReceived, to restore the request body to its original form. Why? Because if we don’t do this, with every request sent, ZAP will replace the body value with the one actually sent to the server, causing us to lose information about the actual content sent to the server, and we will have to prepare the request body again from scratch (Fig 1.).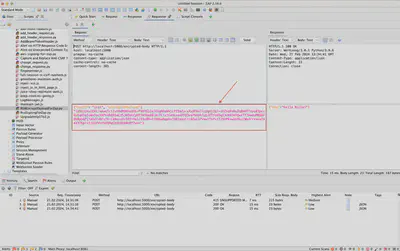
Let’s start from the beginning and focus first on encrypting the message. From the previous article, we know that the Python Scripting extension provides us with the ability to write scripts in Python 2.7, which unfortunately is no longer supported. Additionally, we don’t have a straightforward way to install additional libraries using the Python package manager, PyPI. Therefore, in this implementation, I also utilized the ability to execute system commands using the standard subprocess library.
process = subprocess.Popen(cmd, stdout=subprocess.PIPE, stderr=subprocess.PIPE, shell=True)

output, err = process.communicate()
if err.decode() != "":
    raise Exception(err)
I used the functionality offered by the OpenSSL library to encrypt the message using the RSA public key.
cmd = 'printf %s "{}" | openssl pkeyutl -encrypt -pubin -inkey {} | openssl base64'.format(body_b64, PUBLIC_KEY)
To bring everything together into one function handling encryption, we need one more step. The API implementation author, to address issues with unexpected characters caused by different encoding forms, employed base64 encoding. Therefore, before encrypting the message body, we need to encode it into base64 format.
body_b64 = base64.standard_b64encode(json.dumps(body, ensure_ascii=False).encode()).decode()
Now we can put it all together:
def encrypt_body(body):
    body_b64 = base64.standard_b64encode(json.dumps(body, ensure_ascii=False).encode()).decode()

    cmd = 'printf %s "{}" | openssl pkeyutl -encrypt -pubin -inkey {} | openssl base64'.format(body_b64, PUBLIC_KEY)
    process = subprocess.Popen(cmd, stdout=subprocess.PIPE, stderr=subprocess.PIPE, shell=True)
    output, err = process.communicate()
    if err.decode() != "":
        raise Exception(err)

    return output.decode().replace("\n", "")
At this point, all we have left is to intercept the message, encrypt it, and replace it before sending. In the first step, we use the getRequestBody method to retrieve the current request value, then we deserialize it. This process aims to remove all unwanted white spaces. Then, we encrypt the request body using the previously presented encrypt function.
body = msg.getRequestBody().toString()
body = json.loads(body)
encrypted_body = encrypt_body(body)
new_payload = PAYLOAD.replace(PAYLOAD_PLACEHOLDER, encrypted_body)
msg.setRequestBody(new_payload)
The attentive reader should notice the following line of code:
new_payload = PAYLOAD.replace(PAYLOAD_PLACEHOLDER, encrypted_body)
Why do we replace PAYLOAD_PLACEHOLDER instead of using a dictionary and JSON deserialization? The differences in serialization between Python 2 and Python 3, as I mentioned in previous articles. If we use both encryption and signing, differences in deserialization could cause digital signatures to not match.
At this point, the first significant difference between implementing the script in ZAP and Burp has emerged. Burp automatically updates the Content-Length header value, so we don’t have to worry about it. However, in ZAP, we need to take care of it ourselves. It’s not difficult, but quite significant, especially when initially wondering why the message sent to the server is being truncated. The lack of Content-Length update caused the message sent by ZAP and intercepted by the second proxy to appear as shown in Fig 2.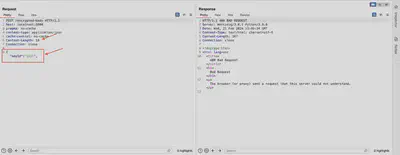
I solved the problem by manually updating the value of the Content-Length header as follows:
msg.getRequestHeader().setContentLength(msg.getRequestBody().length())
At this point, we have one last problem to solve, namely restoring the request to its original form, as I mentioned at the beginning of this section. Here, I used a simple trick: I save the unencrypted request value in a note accessible for each sent request. Then, using the responseReceived function, I restore the request to its original state. Saving a note:
msg.setNote(body)
Restoring the request value:
def responseReceived(msg, initiator, helper):
    body = msg.getNote()
    msg.setRequestBody(body)
An additional advantage of this solution is that in the history of executed requests, we will see the encrypted request sent to the server, while in the notes, its value will be in plaintext (Fig 3).
That concludes the description of the implementation. The whole solution will look as follows:
# RSA Encrypt Payload Script for Zed Attack Proxy - ZAP
# HelpAddOn Script - HTTPSender
# Michal Walkowski - https://mwalkowski.com/
#
# Tested with Jython 14 beta and ZAP 2.14.0
# Based On: https://mwalkowski.com/post/using-burp-python-scripts-to-encrypt-requests-with-rsa-keys/
# You can test the script's functionality using https://github.com/mwalkowski/api-request-security-poc


import json
import base64
import subprocess

# path to public.pem
PUBLIC_KEY = "public.pem"

PAYLOAD_PLACEHOLDER = "PAYLOAD"
PAYLOAD = '{\"keyId\": \"init\", \"encryptedPayload\": \"' + PAYLOAD_PLACEHOLDER + '\"}'


def encrypt_body(body):
    body_b64 = base64.standard_b64encode(json.dumps(body, ensure_ascii=False).encode()).decode()

    cmd = 'printf %s "{}" | openssl pkeyutl -encrypt -pubin -inkey {} | openssl base64'.format(body_b64, PUBLIC_KEY)
    process = subprocess.Popen(cmd, stdout=subprocess.PIPE, stderr=subprocess.PIPE, shell=True)
    output, err = process.communicate()
    if err.decode() != "":
        raise Exception(err)

    return output.decode().replace("\n", "")


def sendingRequest(msg, initiator, helper):
    body = msg.getRequestBody().toString()
    msg.setNote(body)
    body = json.loads(body)
    encrypted_body = encrypt_body(body)
    new_payload = PAYLOAD.replace(PAYLOAD_PLACEHOLDER, encrypted_body)
    msg.setRequestBody(new_payload)
    msg.getRequestHeader().setContentLength(msg.getRequestBody().length())


def responseReceived(msg, initiator, helper):
    body = msg.getNote()
    msg.setRequestBody(body)
Example of Usage
Below, I present the functioning of the described scripts, I also attach a video
In Figure 4, sending a request in plaintext – unencrypted – is depicted, which, according to the implementation, is processed by the server. As seen in the server’s response, the request processing failed, as the server expects a message with the encryptedPayload field.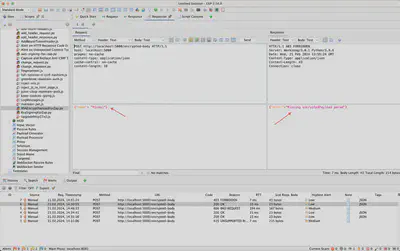
In Figure 5, the same request is depicted, this time utilizing the written script. As evident from the server’s response, the request was processed correctly.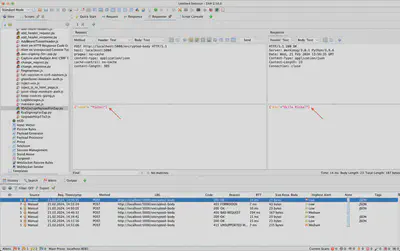
In Figure 6, the actual sent request to the server is shown, which has been logged in the history. It can be observed that the message body has been completely changed to the format expected by our server.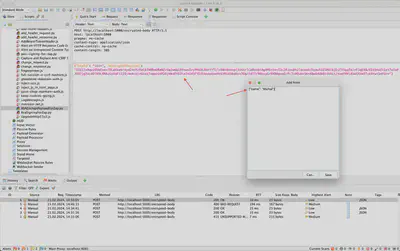
As mentioned earlier, as a final touch, a digital signature using an RSA key will be added to the sent message. We will use the script written in the previous article for this purpose. To ensure everything works properly in ZAP, the order of script execution must be maintained, meaning the encryption script should be enabled first, followed by the signing script.
In Figure 7, the sent request is shown, missing the previously mentioned headers responsible for our digital signature: ‘X-Nonce-Value’ and ‘X-Nonce-Created-At’, as well as ‘X-Signature’.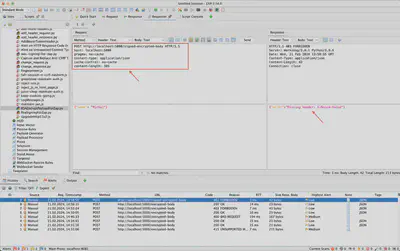
In Figure 8, the sent request is shown, which is correctly interpreted by the server.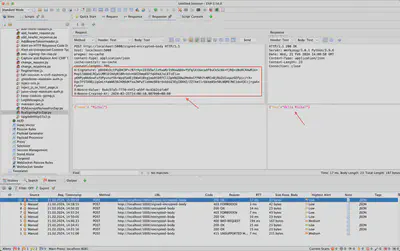
In Figure 9, the sent request logged in the history is shown. As we can observe, the message sent to the server has been encrypted. Additionally, the headers ‘X-Nonce-Value’ and ‘X-Nonce-Created-At’ have been added, and the message has been digitally signed.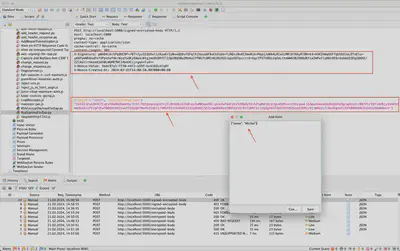
Summary
In this article, I revisited the topic of testing APIs secured by encryption and request signing mechanisms using RSA keys. I decided to revisit this topic to adapt solutions to the Zed Attack Proxy (ZAP) software, where behavior differs from other tools. Additionally, I presented how to use two different scripts to modify requests on-the-fly in a way expected by the server, greatly facilitating API testing.
References
- https://en.wikipedia.org/wiki/Replay_attack
- https://www.zimuel.it/blog/sign-and-verify-a-file-using-openssl
- https://sereysethy.github.io/encryption/2017/10/23/encryption-decryption.html
- https://httpwg.org/http-extensions/draft-ietf-httpbis-message-signatures.html#name-rsassa-pkcs1-v1_5-using-sha
- https://www.zaproxy.org/docs/desktop/addons/python-scripting/
- https://github.com/zaproxy/community-scripts
- https://github.com/mwalkowski/api-request-security-poc/
- https://stackoverflow.com/questions/51769239/why-json-dumps-in-python-3-return-a-different-value-of-python-2
- https://mwalkowski.com/post/zed-attack-proxy-zap-scripting-and-request-signing-with-rsa-keys/