Example of implementing RSA request signature validation in Python Flask
In the previous articles, I described how one can utilize ZAP and Burp software for testing the security of web applications that implement request signature validation using RSA keys. Based on the interest in these articles, I have come to the conclusion that it is worthwhile to also present an example of implementation from the other side, namely how it can be implemented on the server side. In this article, I will demonstrate how one can implement their own request signature validation using RSA keys in a simple way, using the Python language and the Flask framework.
 Example of implementing RSA request signature validation in Python Flask
Introduction
Request signing is an effective mechanism aimed at securing a web application against attacks, especially those based on modifications of requests sent to the server. It constitutes an additional layer of security, collaborating with the HTTPS protocol and protecting against potential Man-In-The-Middle attacks. In some cases, such like as in AWS S3, request signing may also serve an authentication function, where only the client and server have knowledge of the signature creation method.
The most popular mechanism for request signing is HMAC, based on hash functions such as SHA-2, SHA-1, or MD5. However, this article focuses on the second approach, namely, signing requests using RSA keys. In this case, the client generates a signature using a private key, and the server verifies it using the client’s public key.
It’s worth noting that there are differences between the two methods. In the case of HMAC, a pre-established shared secret key is used, which may pose a risk, as compromising the key would allow an attacker to impersonate the client or part of the server. On the other hand, RSA uses two keys - a private key for signature generation by the client and a public key for verification by the server. However, each key pair must be unique, which can present a challenge.
The presented mechanisms of request signing are effective tools in complicating request manipulation and enhancing the system’s resistance to attacks. The choice between HMAC and RSA should be tailored to the specific nature of the application, with RSA-based request signing being particularly recommended for applications dealing with medical or financial data.
However, it’s essential to remember that implementing such mechanisms requires attention. Transmitting and storing RSA keys on both the client and server sides is a challenge, especially concerning key distribution security and management. Additionally, the use of nonce values and timestamps in combination with the signature can effectively protect against replay attacks.
In the implementation of RSA request signature validation in Python, the pycryptodome library and the Flask framework for the server-side part were utilized. Nevertheless, practical and security aspects should be kept in mind during the implementation of such mechanisms in real-world scenarios.
Description of the implemented algorithm for request signature validation
The presented request security mechanism has been implemented according to the following steps:
- Server Checks for Required Headers - The server verifies the presence of necessary headers in the received request.
- Verification of the Format and Uniqueness of the
X-Nonce-Value- The server checks if the X-Nonce-Value has a valid UUID-4 format and if it has not been repeated in previous requests. - Verification of the Correctness of the
X-Nonce-Created-AtHeader Value - The server verifies the correctness of theX-Nonce-Created-Atheader value. - Verification of the Temporal Validity of the
X-Nonce-Created-AtHeader - The server checks if theX-Nonce-Created-Atheader value is current in the context of time. - Verification of the Signature of the Request - The server proceeds to verify the digital signature of the request, utilizing the public key, method, path, message content,
X-Nonce value, andX-Nonce-Created-Atvalue. - Acceptance or Rejection of the Request - If the digital signature is correct, the API server accepts the request and begins processing it. In case of an invalid signature, the server rejects the request.
The presented algorithm introduces comprehensive verification of each aspect of the request, from header presence to format correctness and temporal validity. This mechanism ensures secure processing of only those requests that meet specific criteria, serving as a crucial element in protecting the server against potential attacks. The implementation of this algorithm aims to provide robust protection against both request errors and potential security threats.
Implementation
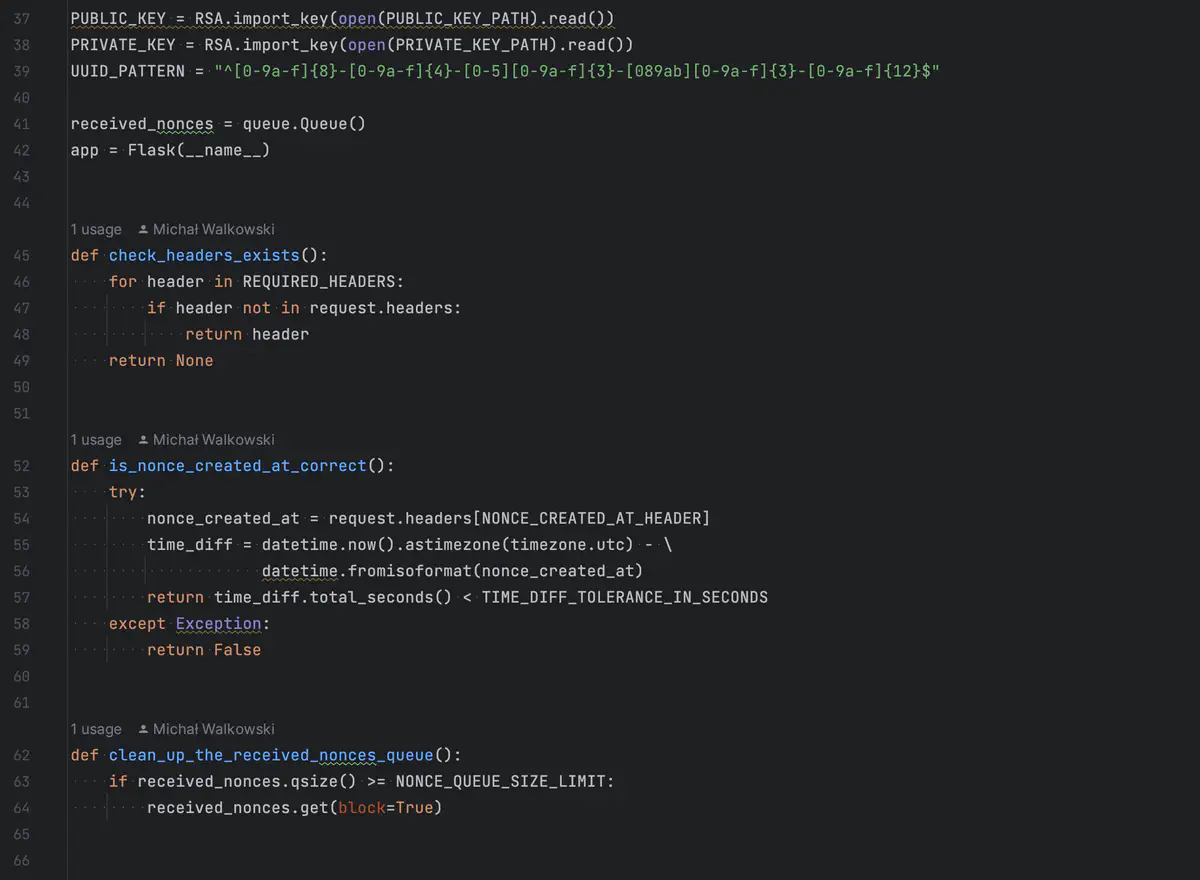
Using the algorithm description presented earlier, let’s now focus on the stages of its implementation. Starting with point 1, which is the verification of the existence of required headers in the received request by the server. In a situation where one of the headers is not found, the function returns the name of the missing header. This implementation effectively informs the client about the absence of a crucial part of the request. Equally important, it allows us to collect diagnostic information in the server logs. The REQUIRED_HEADERS list contains the names of all headers required by our implementation, including X-Nonce-Value, X-Nonce-Created-At, and X-Signature.
def check_headers_exists():
    for header in REQUIRED_HEADERS:
        if header not in request.headers:
            return header
    return None
Another key step in the implementation from our list is point 2 - Verification of the Format and Uniqueness of the X-Nonce-Value. In the described algorithm, the X-Nonce-Value header must have a UUID format. Therefore, before checking the uniqueness of the nonce value, in line number 3, we verify the correctness of the format using a regex function.
It’s worth noting that often header values, such as the one used for tracking requests, should meet specific criteria, but they are rarely properly verified. The lack of such verification can lead to situations where attackers exploit unauthorized values, for example, obfuscating server logs.
In the next stage, we use the queue library to store previously received nonce values. If a new nonce value is not in the queue, we first remove old nonce values and then add the new value. Using a First-In-First-Out (FIFO) queue implemented by the queue library aligns with multi-threading applications, as emphasized in the documentation.
During the implementation of nonce history storage, a significant question arises: ‘How many nonce values should we keep backward?’
def is_nonce_correct():
    nonce = request.headers[NONCE_HEADER]
    if re.match(UUID_PATTERN, nonce) and nonce not in received_nonces.queue:
        clean_up_the_received_nonces_queue()
        received_nonces.put(nonce, block=True)
        return True
    return False
It depends on the characteristics of our application. In the context of the implementation described by me, it was established that the value of the NONCE_QUEUE_SIZE_LIMIT parameter is set to 10. When the number of stored nonces reaches or exceeds this limit, the system automatically removes the oldest received value, maintaining the defined number of the latest nonce values. This is a practical approach that allows for efficient memory management and maintaining optimal system performance.
def clean_up_the_received_nonces_queue():
    if received_nonces.qsize() >= NONCE_QUEUE_SIZE_LIMIT:
        received_nonces.get(block=True)
Steps 3 and 4, namely the Verification of the Correctness of the X-Nonce-Created-At Header Value and the Verification of the Time Validity of the X-Nonce-Created-At Header, have been integrated into one function. Such consolidation is possible because, if parsing the received value using the datetime.fromisoformat function fails, an exception will be automatically raised. This solution allows for simultaneous validation of the header value’s correctness and verification of its time validity, providing an efficient implementation approach.
In the fourth step, to verify if the request is current, it is necessary to calculate the time difference and check whether it falls within the defined time window. In the described case, the value of TIME_DIFF_TOLERANCE_IN_SECONDS has been set to 10 seconds, which is a value adapted for testing purposes. Nevertheless, the recommended value is left to the individual decision of the user to adjust it to the specifics of their application and security requirements.
def is_nonce_created_at_correct():
    try:
        nonce_created_at = request.headers[NONCE_CREATED_AT_HEADER]
        time_diff = datetime.now().astimezone(timezone.utc) - datetime.fromisoformat(nonce_created_at)
        return time_diff.total_seconds() < TIME_DIFF_TOLERANCE_IN_SECONDS
    except Exception:
        return False
In step 5, we proceed to the crucial verification of the digital signature of the request. At this point, we are confident that all other headers are correct, allowing us to move on to a more resource-intensive operation of signature verification. Analogous to the approach used on the client side, we retrieve all necessary markers from the request, such as X-Nonce-Value, X-Nonce-Created-At, method, path, and message content. We combine these markers using the format function, then encode them into base64 format, obtaining the value of signature_input. Subsequently, along with the received signature, we pass them to the verification function.
def is_signature_correct():
    nonce_value = request.headers[NONCE_HEADER]
    nonce_created_at = request.headers[NONCE_CREATED_AT_HEADER]
    signature_input = "{}{}{}{}{}".format(request.method, request.path, nonce_value, nonce_created_at, request.data.decode())
    signature_input_b64 = base64.standard_b64encode(signature_input.encode())
    return verify(signature_input_b64, request.headers[SIGNATURE_HEADER])
The function responsible for verifying the signature of the received request takes only two arguments. The first one is signature_input_b64, from which the hash is calculated using the SHA256 hash function, and the second one is the message signature received from the client. In the final step, the verify function from the pycryptodome library is called. In case of verification failure, an exception will be raised. However, if the verification is successful, the function will return True, indicating the correctness of the received message signature.
def verify(signature_input_b64, received_signature):
    hash = SHA256.new(signature_input_b64)
    try:
        pkcs_signature.new(PUBLIC_KEY).verify(hash, base64.standard_b64decode(received_signature))
    except (ValueError, TypeError)::
        return False
    return True
The last missing element in our implementation is consolidating all the previously presented functions and calling them in the appropriate order. Following the don’t repeat yourself paradigm, we avoid code duplication, meaning we don’t want each function to be called directly in the function handling a specific endpoint of our Flask server. To achieve this, we use decorators. The implementation will take the following form:
def signature_required(f):
    @wraps(f)
    def decorator(*args, **kwargs):
        missing_header = check_headers_exists()

        if missing_header:
            return make_response(jsonify({"error": f"Missing header: {missing_header}"}))

        if not is_nonce_created_at_correct():
            return make_response(jsonify({"error": "The request is time-barred"}))

        if not is_nonce_correct():
            return make_response(jsonify({"error": "Nonce is already used"}))

        if not is_signature_correct():
            return make_response(jsonify({"error": f"Invalid Signature"}))

        return f(*args, **kwargs)
    return decorator
Below is the code representing the ‘/signed-body’ endpoint, which only accepts POST requests and requires the verification of a digital signature before processing. This serves as an example of using the @signature_required decorator in the context of a function handling a specific request within the Flask application.
@app.route("/signed-body", methods=["POST"])
@signature_required
def signed_body():
    return jsonify({"msg": "Ok!"})
The entire Proof of Concept (PoC) presented in this article can be found on my GitHub at this link.
Example of Usage
In this section of the article, I will demonstrate the functionality of the above code. To test it, I used ZAP and the script discussed in this article, which is also available in the community-scripts repository. In Figure 1, an attempt to send a request without additional headers is shown. As you can see, the server indicated their absence and did not process the message.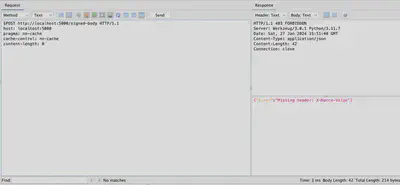
In Figure 2, another attempt to send a request is shown, this time with the required headers added. However, a change in the message body resulted in a lack of signature compatibility, leading to the rejection of the message by the server.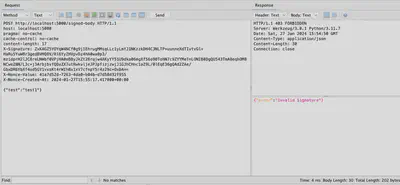
In figure 3, the use of the provided code is illustrated. The nonce and signature headers are correct, as evidenced by the server’s valid response.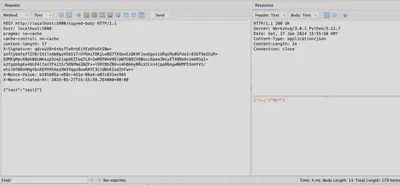
In figure 4, the request is sent again with the same unchanged values of X-Nonce-Value and X-Nonce-Created-At. As we can see, the server first checks, as expected, whether the X-Nonce value has not been repeated, and in case of receiving the same value, it reports an error.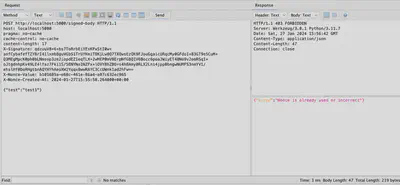
On figure 5, the same request was sent again, this time with a new value for X-Nonce-Value but without updating X-Nonce-Created-At. In response, the server indicates the request has expired.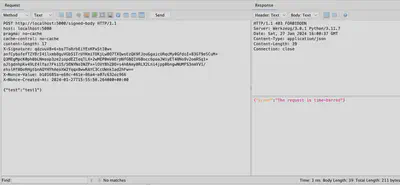
Summary
In this article, I present a practical example of implementing request signature validation using RSA keys on the server side, utilizing Python and the Flask framework. I discussed the significance of signing requests in the context of web application security, with a particular focus on the RSA key-based mechanism.
I elaborated on the differences between the popular HMAC mechanism and the RSA key-based approach. Additionally, I focused on the practical and secure aspects of implementing such mechanisms.
I provided a detailed description of the implemented request signature validation algorithm, covering steps such as header verification, checking the format and uniqueness of the nonce value, time verification, and the crucial step of verifying the digital signature of the request. The entire process was consolidated into a function handling the @signature_required decorator, enabling efficient and modular code management.
The presented code and the description of verification steps can serve as a valuable source of information for developers dealing with web application security aspects. I believe that this implementation will contribute to increasing awareness and understanding of the request signature validation process using RSA keys in the context of web application protection.
References
- https://en.wikipedia.org/wiki/Man-in-the-middle_attack
- https://docs.aws.amazon.com/AmazonS3/latest/API/sig-v4-authenticating-requests.html
- https://en.wikipedia.org/wiki/HMAC
- https://datatracker.ietf.org/doc/html/draft-ietf-httpbis-message-signatures
- https://en.wikipedia.org/wiki/Replay_attack
- https://www.pycryptodome.org/
- https://flask.palletsprojects.com/
- https://docs.python.org/3/library/queue.html
- https://en.wikipedia.org/wiki/FIFO_(computing_and_electronics)
- https://en.wikipedia.org/wiki/Don%27t_repeat_yourself
- https://circleci.com/blog/authentication-decorators-flask/
- https://github.com/mwalkowski/api-request-security-poc
- https://mwalkowski.com/post/using-burp-python-scripts-to-sign-requests-with-rsa-keys/
- https://mwalkowski.com/post/zed-attack-proxy-zap-scripting-and-request-signing-with-rsa-keys/