Dark Side, Backend Side, requests encryption with RSA in Python Flask - part II
In this article, continuing our series, we dive back into the topic of securing backend services using advanced encryption techniques and signing requests with RSA keys within the context of the Flask framework for Python. We will focus on ensuring not only the confidentiality of data through encryption but also its integrity and authenticity using RSA signatures. I will present how to implement encryption and decryption of data and integration with a signature, in order to protect communication against various cyber threats such as replay attacks. The aim of the article is to introduce other possible mechanisms for securing communication other than certificate pinning, and to add another layer of security besides the encryption offered by HTTPS.
 Dark Side, Backend Side, requests encryption with RSA in Python Flask - part II
Introduction
In the previous articles, I explained why I decided to describe the following implementations. Today, I would like to conclude the series of posts describing the mechanisms of encrypting and signing requests with RSA keys. For those interested in implementing the mentioned mechanisms, I have prepared the Flask-RSA library, which is also available for download from the PyPI package manager.
As a reminder, the creation of this series of articles on encrypting and signing requests in APIs is related to a project I had the pleasure of testing. The mechanisms presented here are used in a real API for communication between the backend and a mobile application. The project author, in addition to the request signing mechanism (X-Signature header) and protection against replay attacks (headers X-Nonce-Value and X-Nonce-Created-At), which I described in earlier articles, also decided to use encryption of request content using RSA keys. All these protections significantly complicate the examination of the communication by attackers, especially in the absence of internal knowledge about the implementation.
Returning to the main topic, RSA encryption is an asymmetric encryption method that uses a pair of keys: public and private. The public key is used to encrypt data, which can then only be decrypted using the corresponding private key. In the context of Flask, the RSA request encryption process begins with the use of the server’s public key to encrypt the content of the request sent by the client. In the implementation presented below, the server additionally encrypts the response sent to the client using his public key. In practice, this means that only the communicants can understand the entire communication. However, this requires that both parties exchange their public keys.
Implementing encryption in Flask primarily requires the generation of a pair of RSA keys. This can be done using tools such as OpenSSL or directly in Python using the pycryptodome library. After generation, the public key must be made available to the message sender, while the private key is securely stored on the receiver’s side.
During the implementation of RSA encryption and signing of requests, developers may encounter several challenges, such as key management or protection against replay attacks. Protection against replay attacks can be achieved by adding a nonce value and timestamp to the request, which are then verified on the server side. This ensures that the request is unique and was sent within the appropriate time window. Additionally, to ensure the integrity of the message, a signature made using the message sender’s private key will be attached.
Description of the implemented algorithm for request signature validation
In this section, I would like to remind the reader how the mechanism described in this article differs from the one described in “Example of implementing RSA request signature validation in Python Flask”. The current process includes additional steps related to encrypting and decrypting the request content. The new version of the mechanism looks as follows:
- The application uses the public key received from the server to encrypt the content of the request.
- The application creates a standardized request schema that includes the encrypted message.
- The application adds a unique nonce value to the request, generated using uuid4 (header
X-Nonce-Value). - The application attaches the current date to the request (header
X-Nonce-Created-At). - The mobile application creates a signature of the request using its private key, message content, path, nonce value, and current date.
- The application attaches the generated signature to the request (header
X-Signature). - The API server checks the correctness of the signature using the client’s public key.
- If the signature is valid, the API server accepts the request. In case of an invalid signature, the request is rejected.
- The API server decrypts the message using its private key.
Additionally, I remind that the analyzed mechanism did not detail the procedures regarding the exchange of public keys between communication parties. It is assumed that those implementing this mechanism have already considered all available methods of key exchange.
In the next part of the article, we will focus on simplifying the entire process by using only one pair of RSA keys.
Implementation
Below is the implementation of a decorator, whose goal is to decrypt the content of incoming requests, which have been encrypted using the server’s public key, and to pass the decrypted content to the original request handling function. The presented process of decrypting the received request looks as follows:
- Receiving the request: the function awaits a request sent in JSON format. Using the
request.get_json()method, it retrieves the content of the request. - Checking the message’s validity: The function checks whether the received request is in the correct format and whether the JSON message body contains a specific key (
self._encrypted_payload_key), under which the encrypted message is expected. - Decrypting the message: If the appropriate key is found in the request, the payload is decrypted using the server’s private key (
_server_private_key). The OAEP algorithm with MGF1 and SHA-256 as the hashing function is used for decryption. Decryption transforms the encrypted data from base64 format into plaintext. - Processing the Payload: The decrypted content is then decoded from base64 format and transformed back into a JSON object (
request_body), which is passed to the original request handling function as an argument. - Exception Handling: In case of errors during the decryption process (for example, if decryption fails for any reason), the decorator logs the problem and returns an error response.
- Missing Encrypted Payload Key: If the expected key for the encrypted payload is not found in the request, the decorator returns a response informing about the missing key. The code implementing the above steps is as follows:
def encrypted_request(self):
    def _encrypted_request(f):
        @wraps(f)
        def decorator(*args, **kwargs):
            msg = request.get_json()
            if self._encrypted_payload_key in msg:

                try:
                    plaintext = _server_private_key.decrypt(
                        base64.standard_b64decode(msg[self._encrypted_payload_key]),
                        padding.OAEP(
                            mgf=padding.MGF1(algorithm=hashes.SHA256()),
                            algorithm=hashes.SHA256(),
                            label=None
                        )
                    )
                    request_body = json.loads(base64.standard_b64decode(plaintext))
                    return f(request_body, *args, **kwargs)
                except Exception as e:  # pylint: disable=broad-exception-caught
                    self._logger.error('Decryption problem %s', e)
                    return self._make_response('Decryption problem')
            else:
                return self._make_response(f'Missing {self._encrypted_payload_key} param')

        return decorator

    return _encrypted_request
The second implementation I want to present is a decorator designed to encrypt server responses before sending them to the client. The main goal of this decorator is to ensure that all data sent from the server to the client is encrypted, enhancing the security of data transmission, especially in the context of sensitive information. Here is how this decorator works:
- Calling the Response Function: The decorator first allows the original request handling function to perform its logic and generate a response (response).
- Encrypting Response Data: Then, using the client’s public key (
client_public_key), the decorator encrypts the data contained in the response. Encryption is performed using the OAEP algorithm with MGF1 and SHA-256 as the hashing function. The response data is first encoded into base64 format, then encrypted. - Preparing the Encrypted Message: The encrypted text (
ciphertext) is then added to a predefined response structure (self._encrypted_payload_structure), under a specific key (self._encrypted_payload_key). The entire structure is encoded into base64 format and placed in the response as JSON data. - Returning the Encrypted Response: Finally, the modified response data is reassigned back to the response object (
response.data), and the entire encrypted response is returned to the client.
The code implementing the above steps is as follows:
def encrypted_response(self):
    def _encrypted_response(f):
        @wraps(f)
        def decorator(*args, **kwargs):
            response = f(*args, **kwargs)
            ciphertext = client_public_key.encrypt(
                base64.standard_b64encode(response.data),
                padding.OAEP(
                    mgf=padding.MGF1(algorithm=hashes.SHA256()),
                    algorithm=hashes.SHA256(),
                    label=None
                )
            )
            encrypted_msg = copy.deepcopy(self._encrypted_payload_structure)
            encrypted_msg[self._encrypted_payload_key] = base64.standard_b64encode(
                ciphertext).decode()
            response.data = json.dumps(encrypted_msg)
            return response
        return decorator
    return _encrypted_response
Routes in Action
In this section, I will present how the above implementations works. Let’s start with the first decorator, @encrypted_request. Below is the code for our endpoint that we will be testing.
@app.route("/encrypted-body", methods=["POST"])
@decrypt_body
def encrypted_body():
    return jsonify({"msg": "Hello {}".format(request.data['name'])})
Additionally, to test the functioning of the presented implementation, I used ZAP software and the scripts that I described in these articles. These scripts are also available in the community-scripts repository.
Figure 1 shows sending a request in an explicit - unencrypted manner, which according to the implementation, is processed by the server. As can be seen in the response received from the server, the request processing failed, the server expects a message with the encryptedPayload field.
Figure 2 shows the same request being sent, this time using the written script. As indicated by the response received from the server, the request was processed correctly.
Figure 3 shows the actual request sent to the server, which was logged in the history. We can notice that the body of the message has been completely changed to the format expected by our server.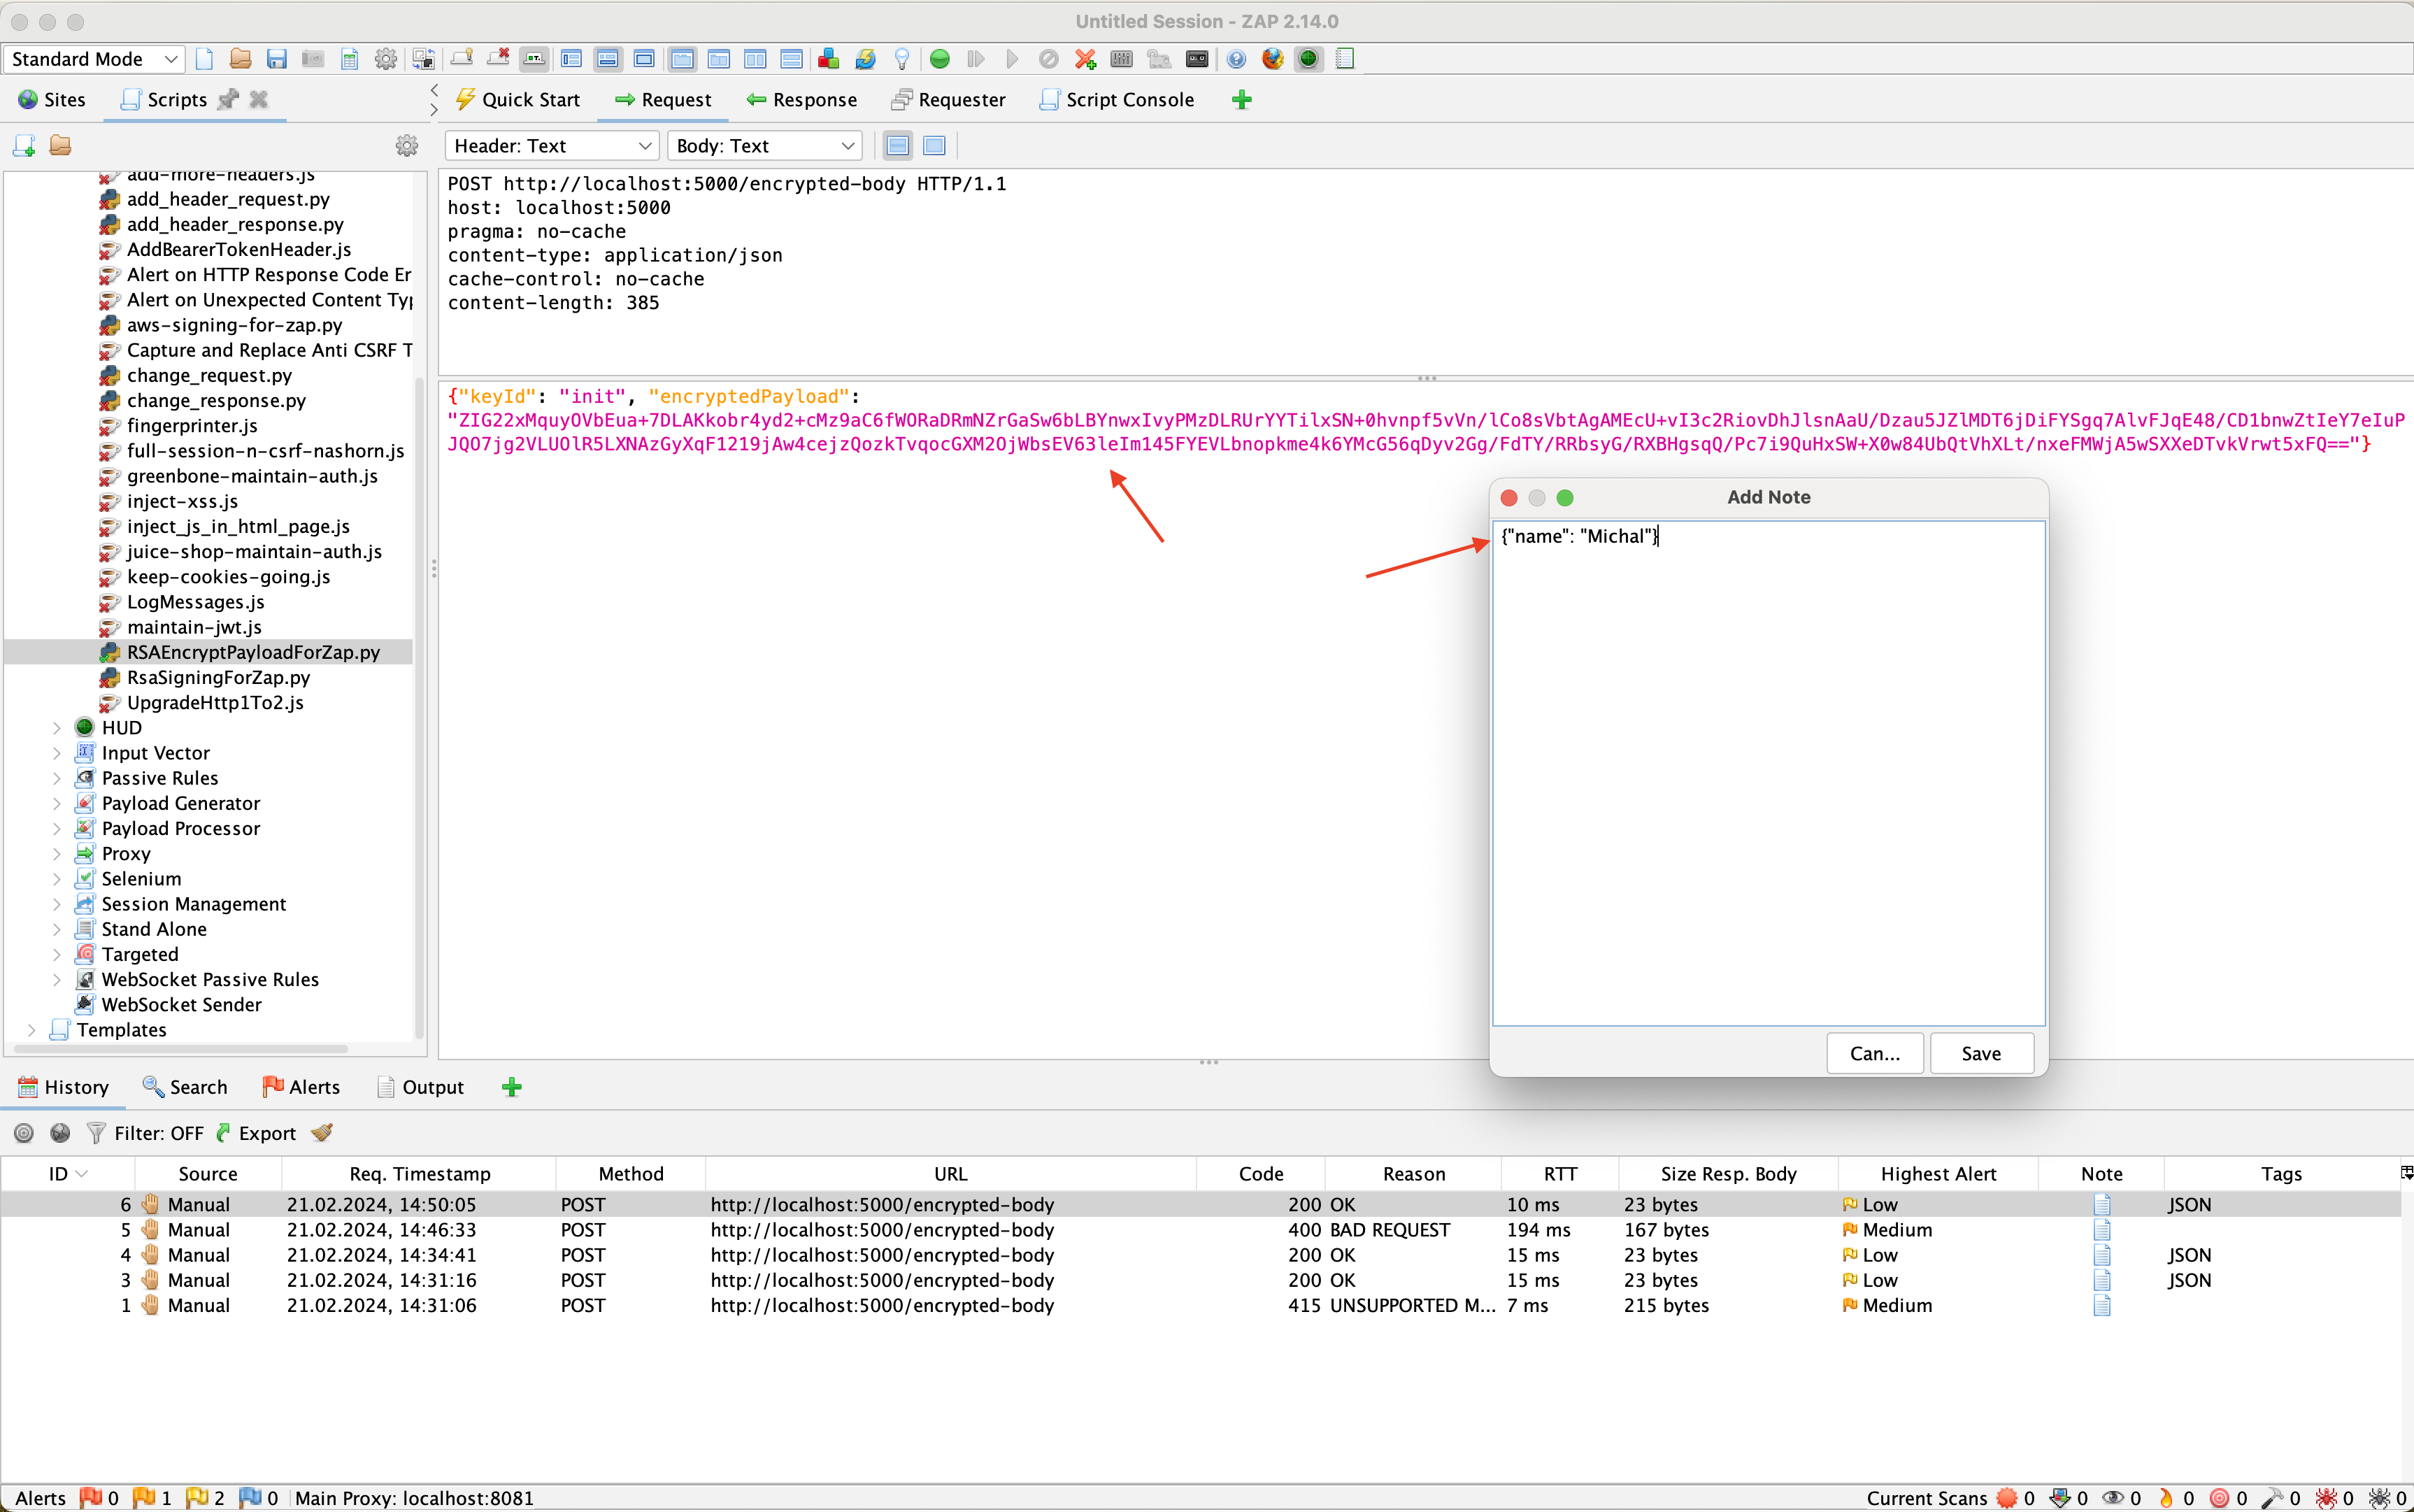
As I mentioned earlier, in the next step to protect against replay attacks, a signature using an RSA key will be added to the sent message. Below is the code for our endpoint that we will be testing.
@app.route("/signed-encrypted-body", methods=["POST"])
@signature_required
@decrypt_body
def signed_encrypted_body():
    return jsonify({"msg": "Hello {}".format(request.data['name'])})
Figure 4 shows the sent request, which lacks the previously mentioned headers responsible for our signature, namely X-Nonce-Value, X-Nonce-Created-At, and X-Signature.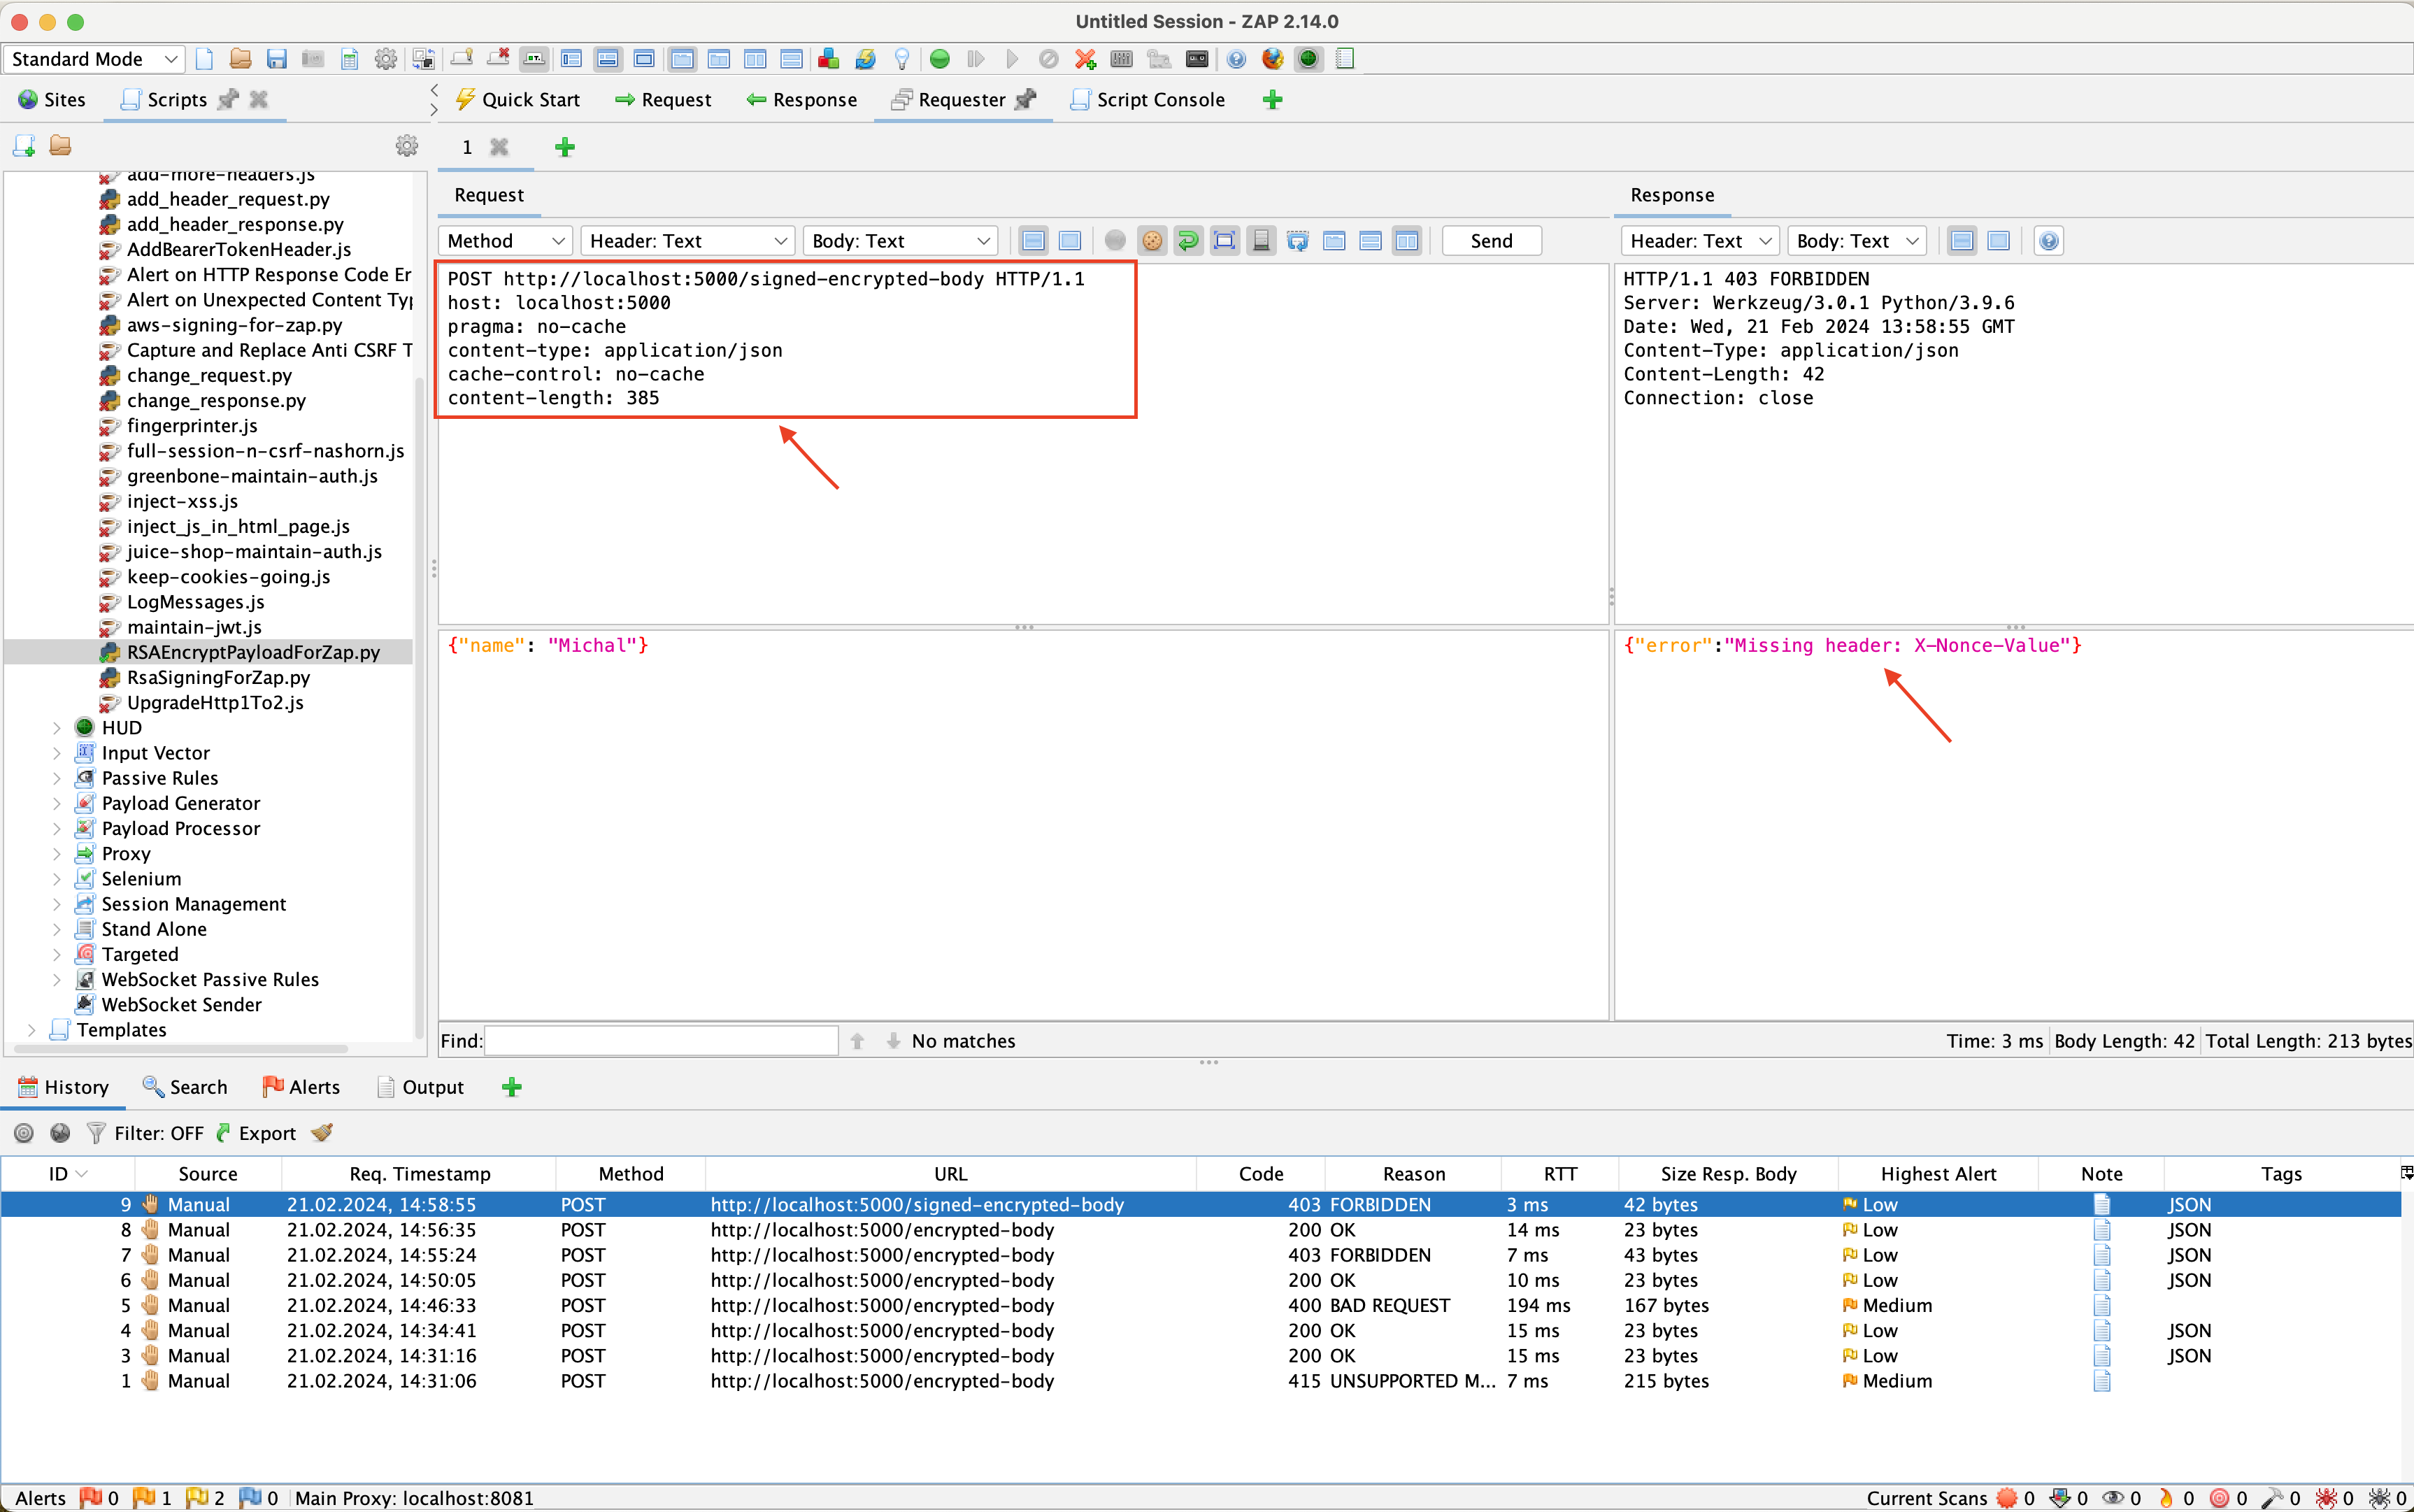
Figure 5 shows the request sent, which is correctly interpreted by the server.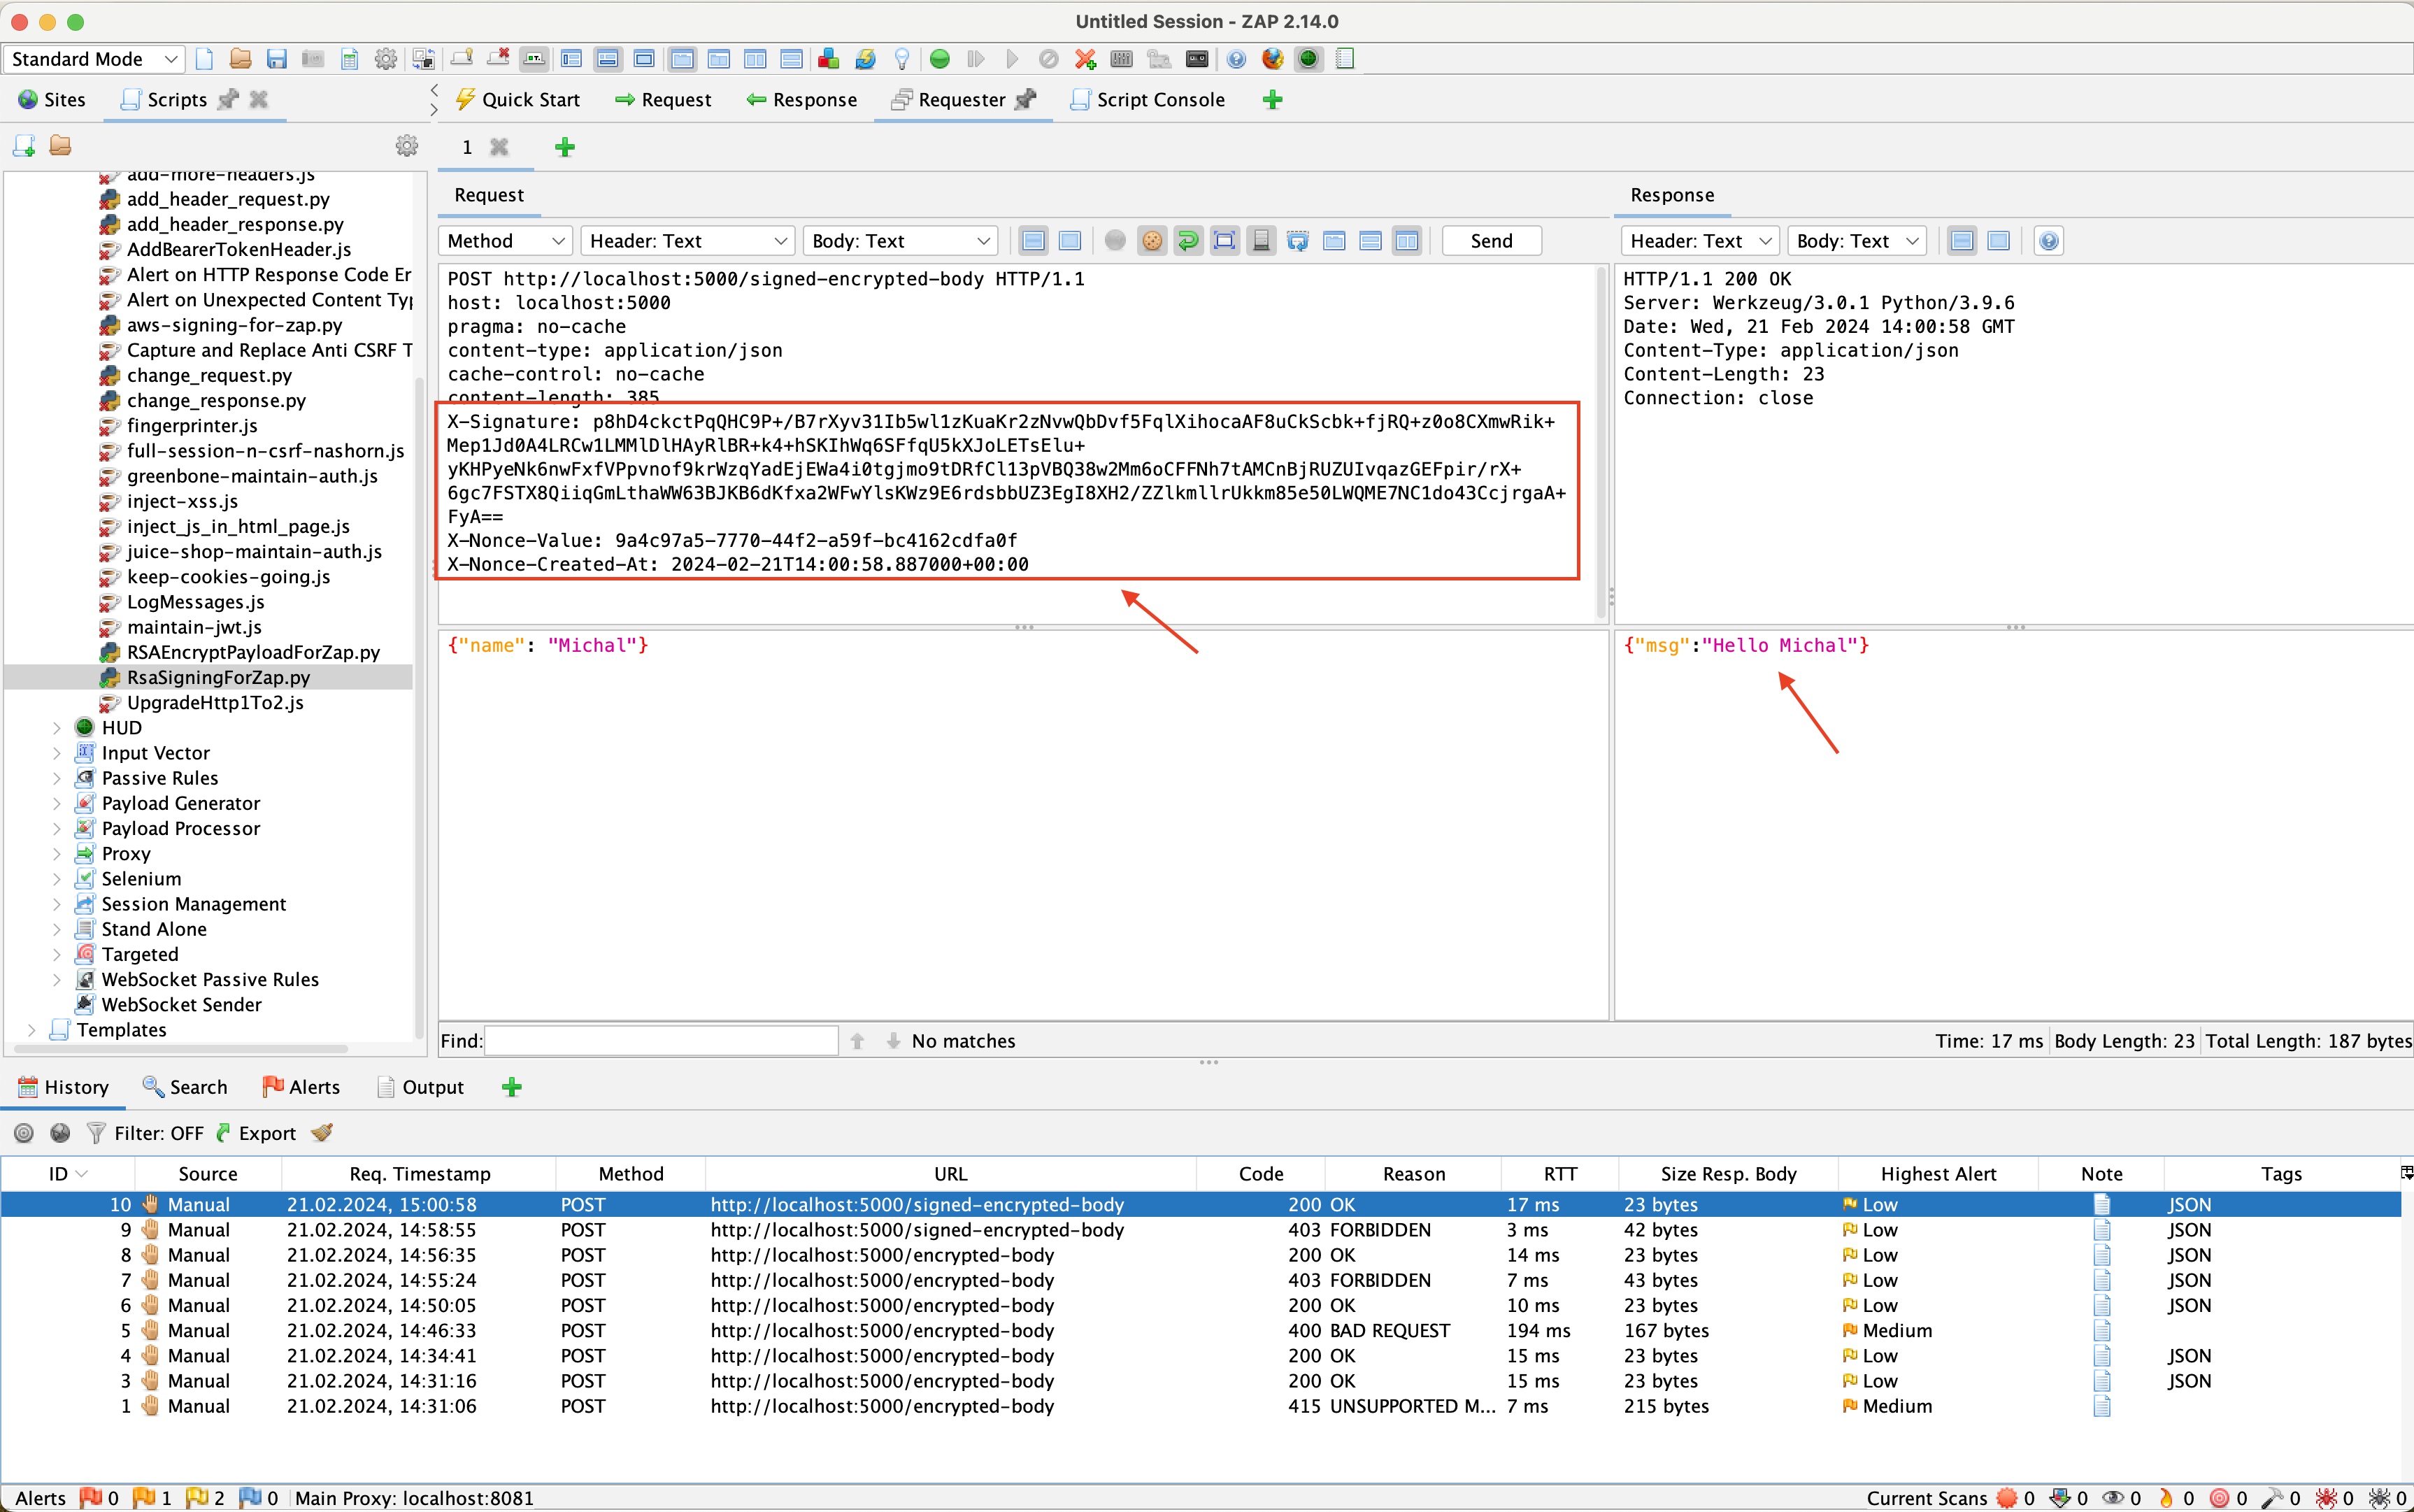
Figure 6 shows the request sent, recorded in the history. As we can notice, the message sent to the server was encrypted. Additionally, the headers X-Nonce-Value and X-Nonce-Created-At were added, and the message was signed.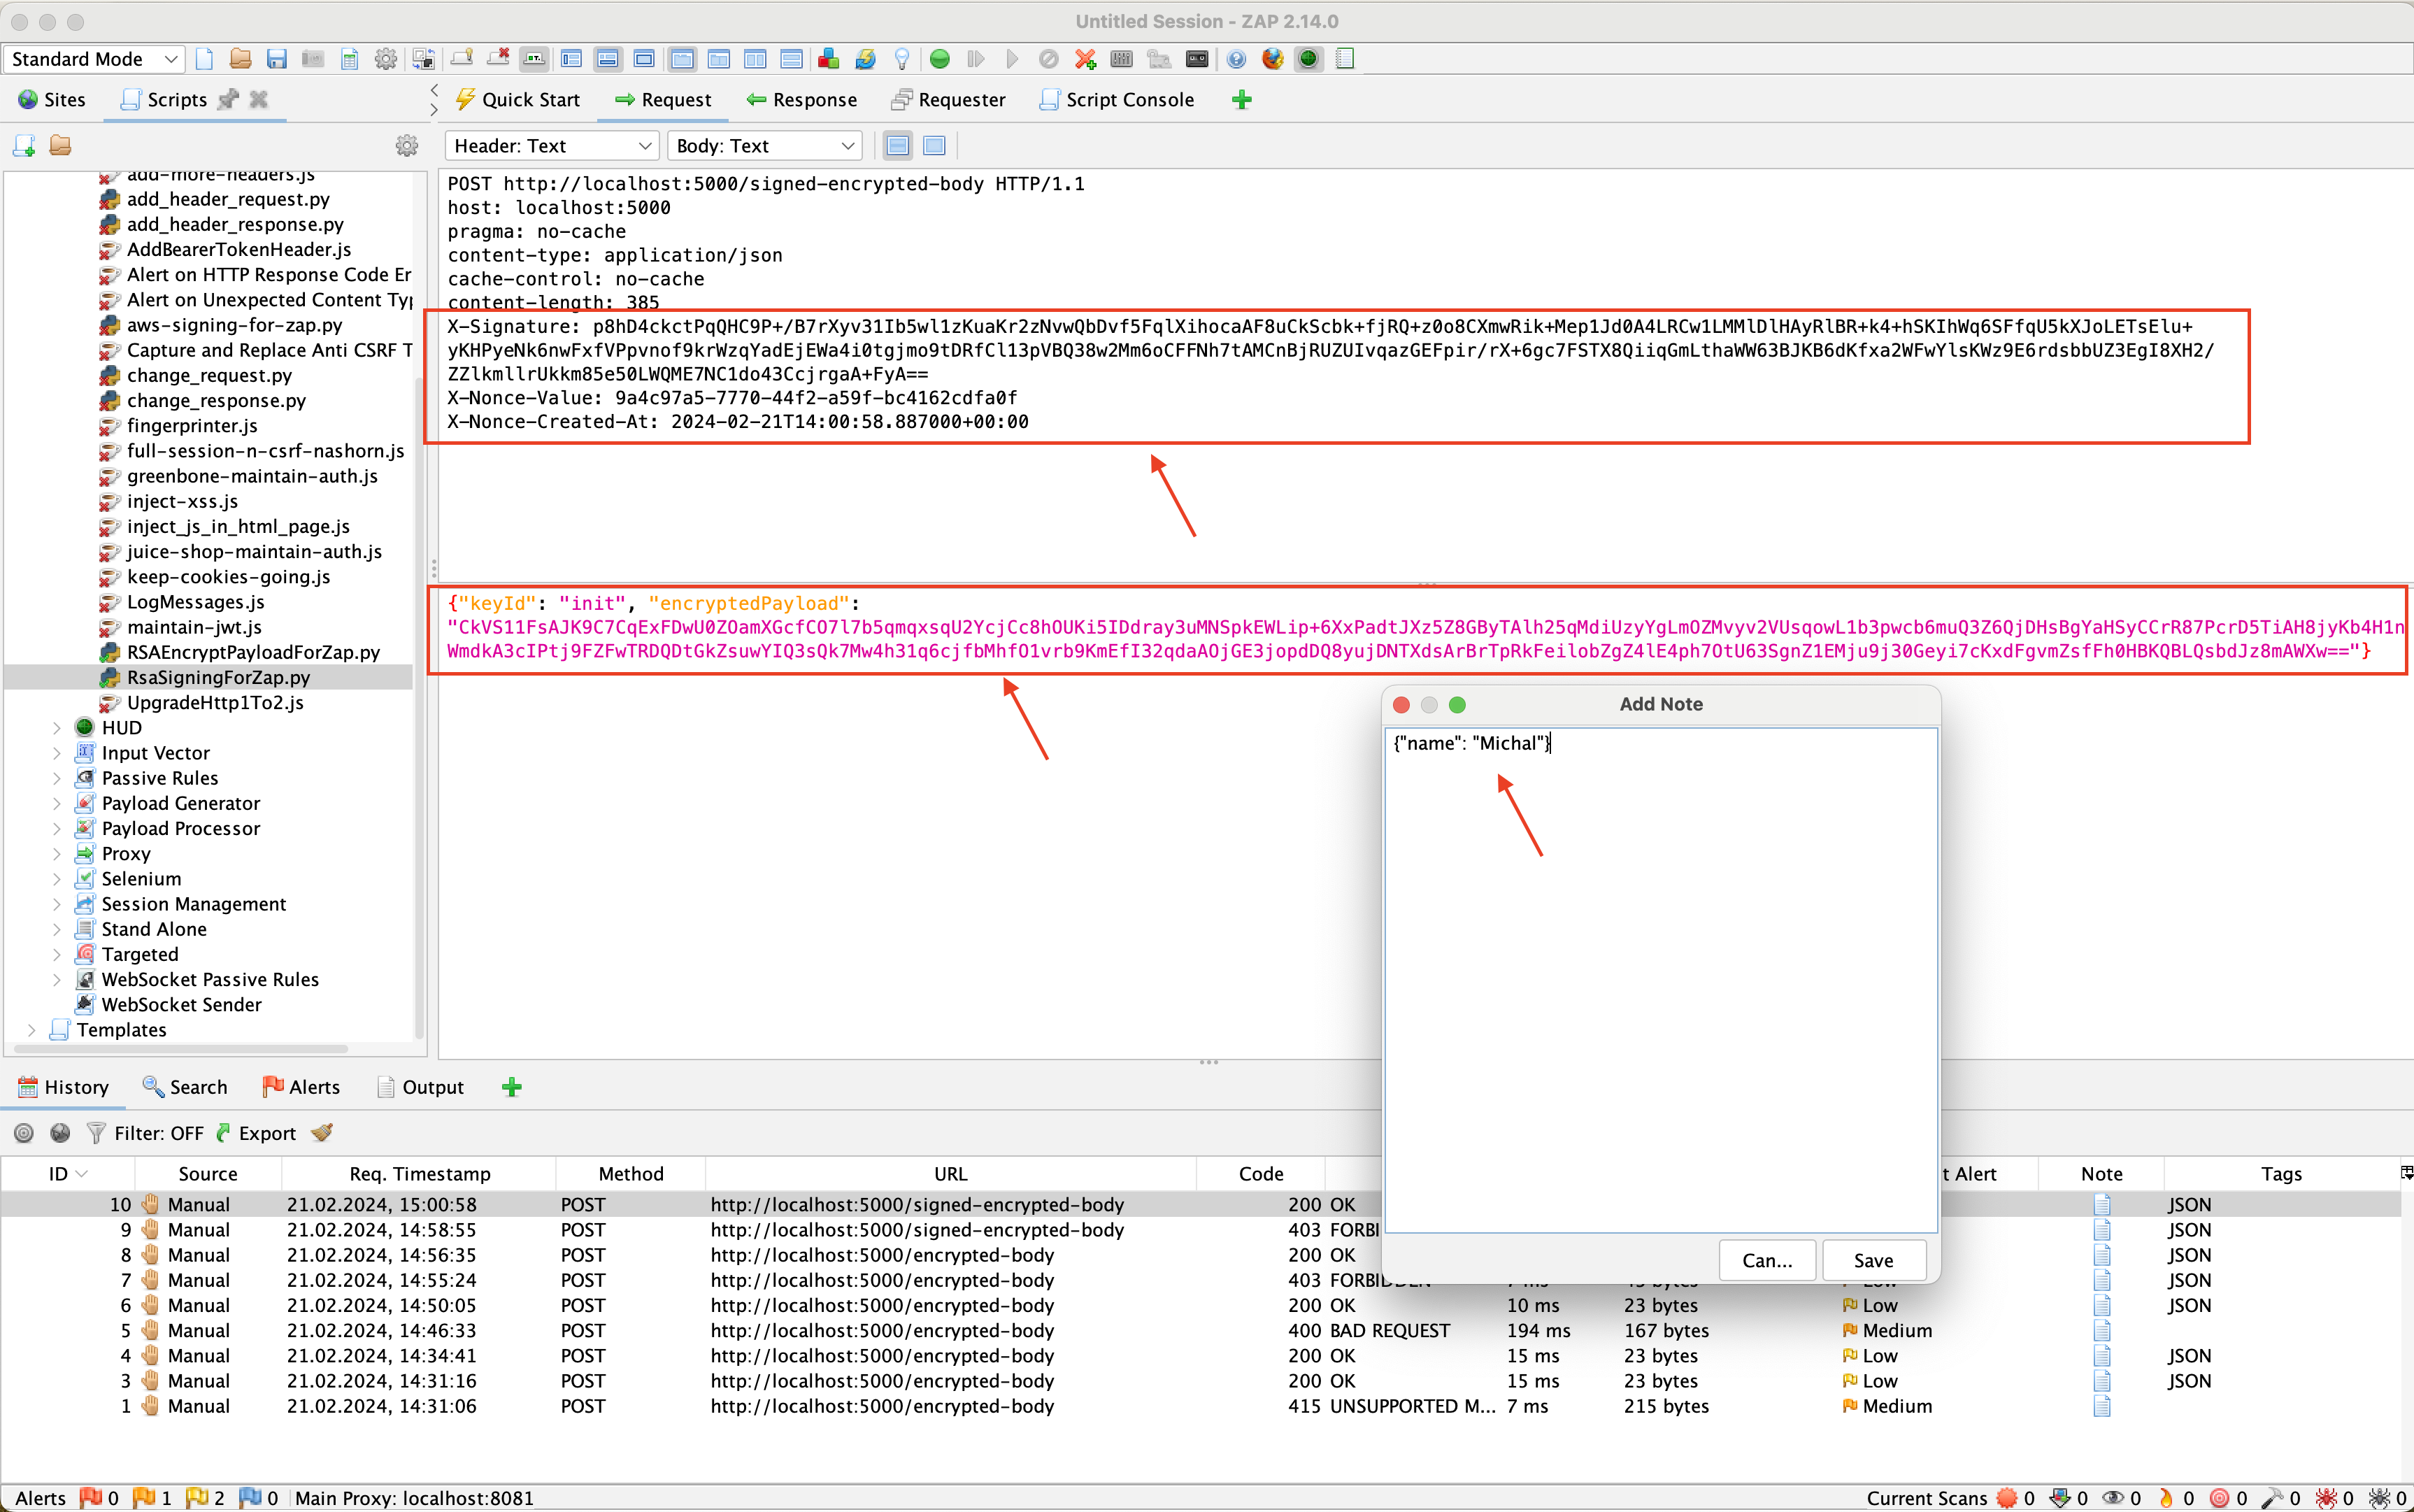
In the final step, we will add encryption of the response from the server, thereby using the last decorator presented in this article, namely @encrypted_response. The code for our endpoint will look as follows:
@app.route('/encrypted-req-resp-signed', methods=['POST'])
@signature_required
@decrypt_body
@encrypt_response
def encrypted_endpoint():
    return jsonify({"msg": "Hello {}".format(request.data['name'])})
Figure 7 shows a correctly encrypted and signed message. The server processed it and encrypted the response.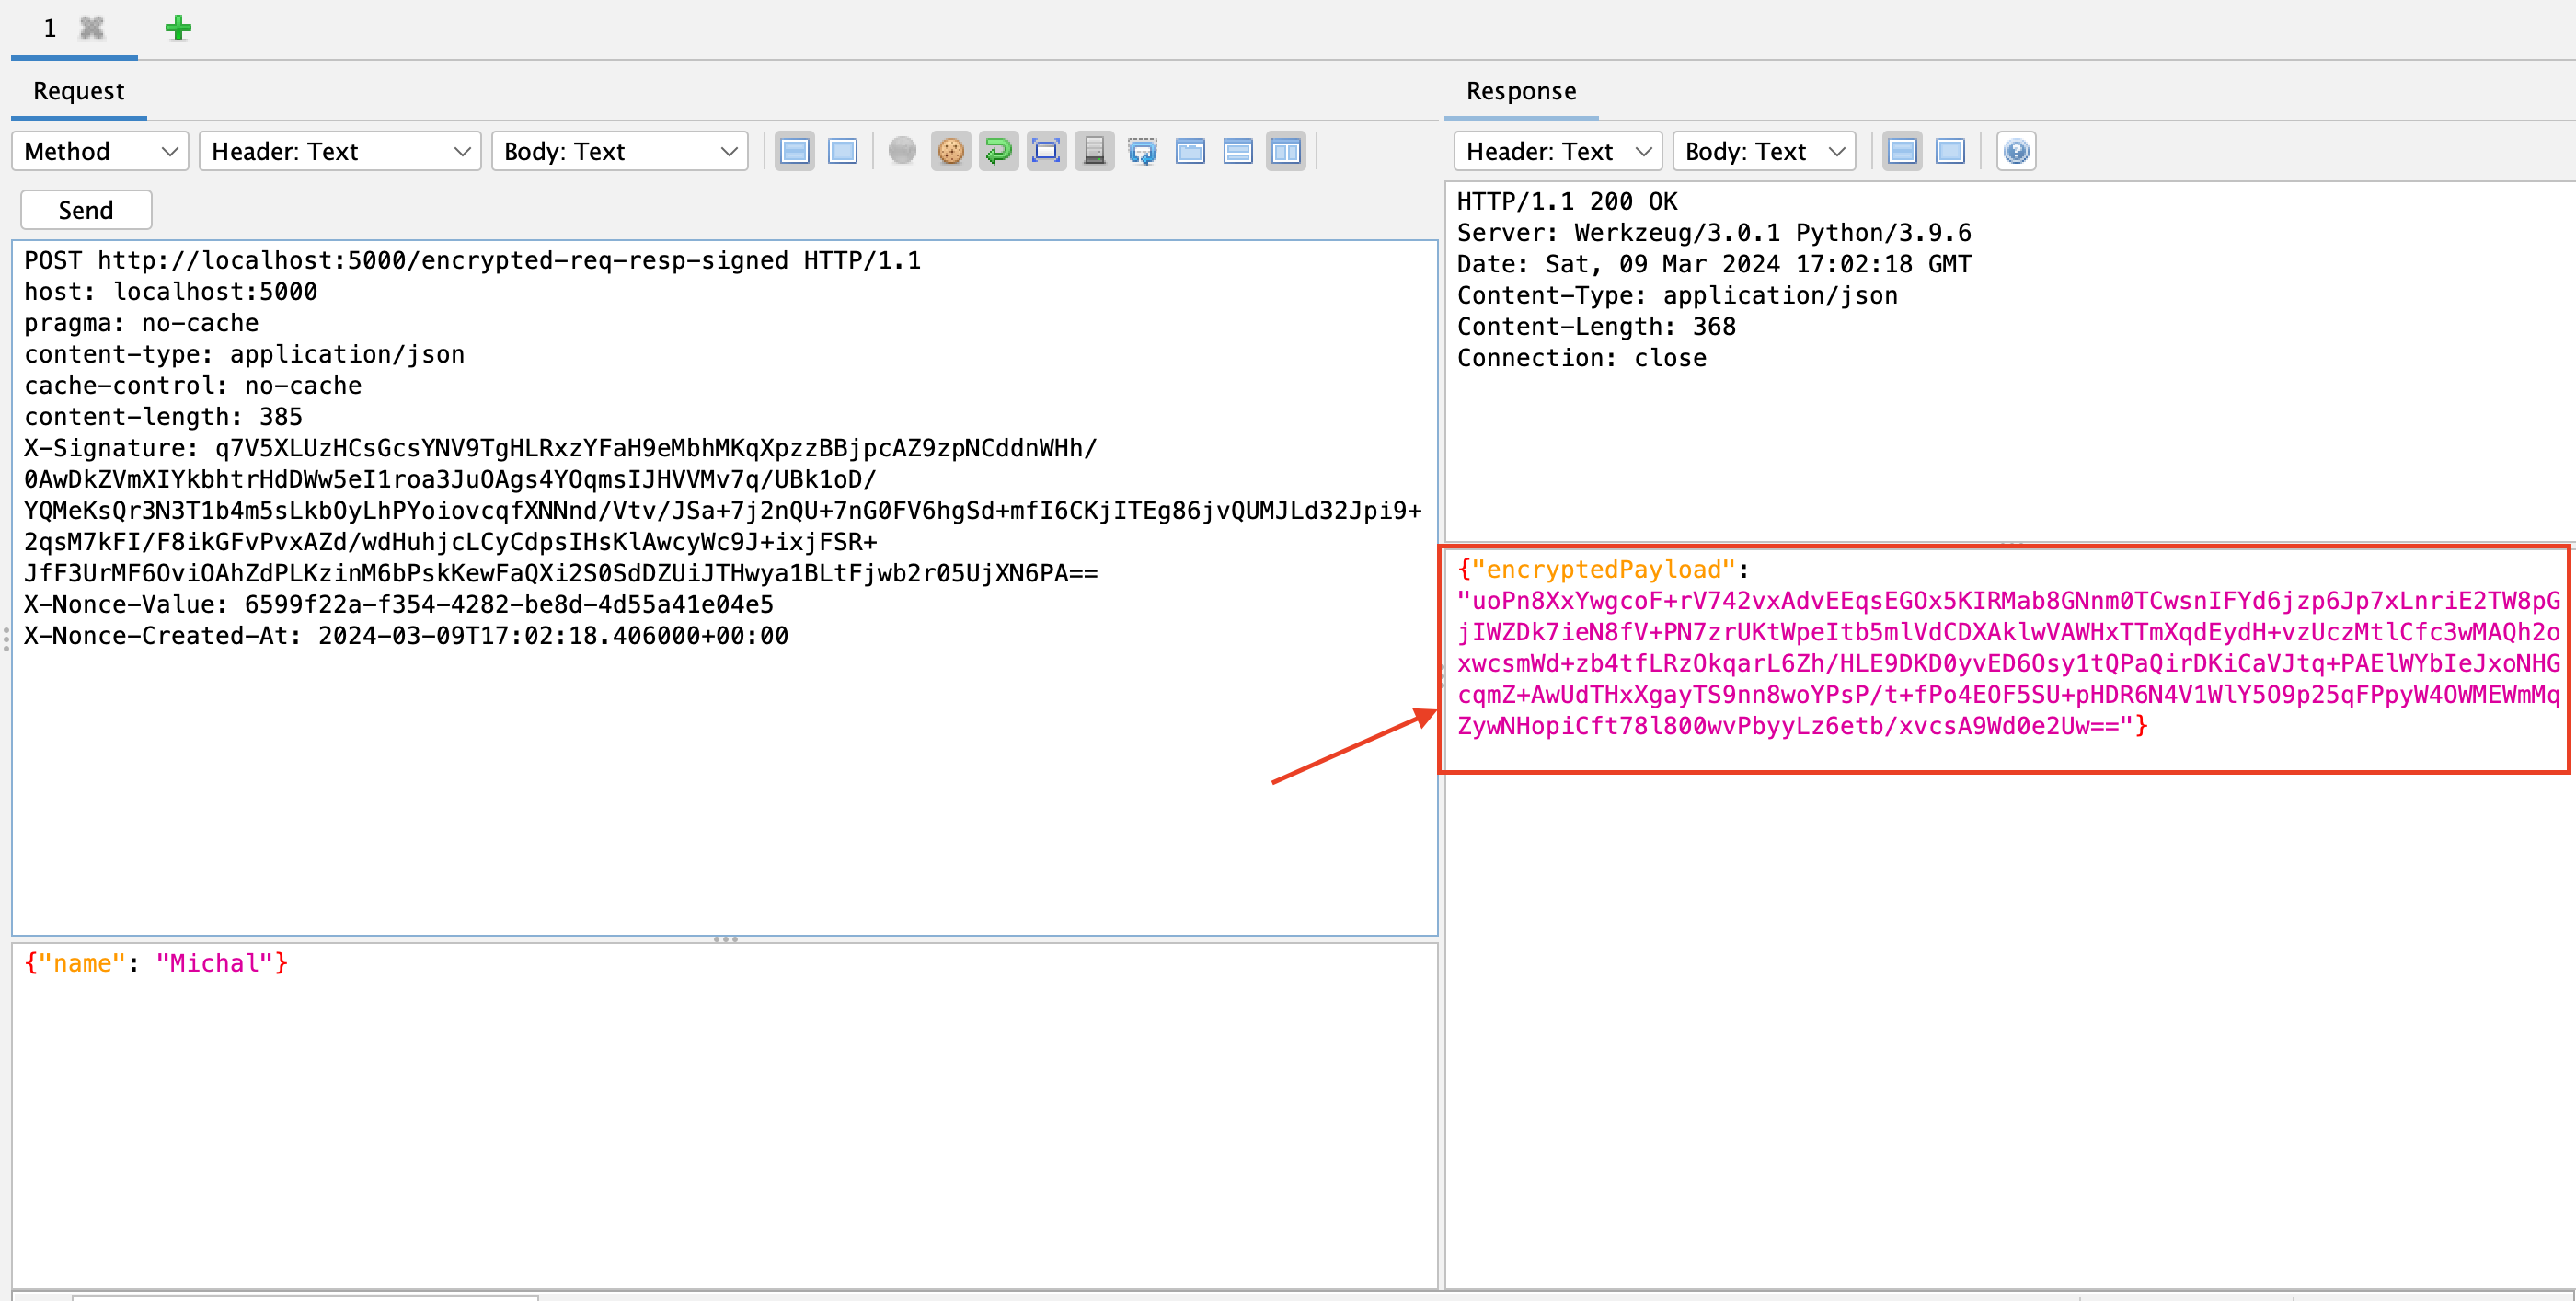
Summary
In this series of articles, we focused on securing backend services using advanced encryption techniques and signing requests with RSA keys within the Flask environment for Python. The main goal was not only to ensure the confidentiality of data through encryption but also their integrity and authenticity by using RSA signatures. The presented solutions protect communication against various cyber threats, including replay attacks, offering an additional layer of security to the standard HTTPS encryption.
We analyzed the processes of encrypting and decrypting data transmitted between the client and the server, as well as integration with a signature, to facilitate the identification and verification of data authenticity. In this context, we presented practical implementations of decorators in Flask, which automate the processes of encrypting server responses and decrypting incoming requests, ensuring data protection at every stage of communication.
A key element is the exchange of public keys between the client and the server, which allows for the encryption and decryption of information in such a way that only authorized parties can access the original message content. The use of RSA keys enables the application of strong asymmetric encryption mechanisms, which are harder to break compared to symmetric methods.
We also discussed the challenges related to key management and protection against replay attacks, emphasizing the importance of using nonce values and timestamps to ensure the uniqueness and timeliness of requests. Furthermore, we pointed out the need for using signatures to ensure the integrity and authenticity of the transmitted data.
References
- https://en.wikipedia.org/wiki/Man-in-the-middle_attack
- https://en.wikipedia.org/wiki/HMAC
- https://en.wikipedia.org/wiki/Replay_attack
- https://httpwg.org/http-extensions/draft-ietf-httpbis-message-signatures.1.html#name-rsassa-pkcs1-v1_5-using-sha
- https://www.pycryptodome.org/
- https://flask.palletsprojects.com/
- https://circleci.com/blog/authentication-decorators-flask/
- https://en.wikipedia.org/wiki/Don%27t_repeat_yourself
- https://mwalkowski.com/post/example-of-implementing-rsa-request-signature-validation-in-python-flask/
- https://mwalkowski.com/post/once-again-zap-scripting-request-encryption-and-finally-signing/
- https://mwalkowski.com/post/using-burp-python-scripts-to-encrypt-requests-with-rsa-keys/